If you are a Gypsy owner, then you want to go to www.provocraft.com and update your Gypsy if you have not done so since November 1. Provocraft is downloading five cartridges to all Gypsy owners who have registered their devices. The cartridges are Christmas, Blackletter (font), Indie Art, Bags, Tags, Boxes, and More, and another font cartridge that I have forgotten the name of (sorry:)). It was a perfectly painless download and now I have 5 more cartridges.
Happy New Year!
Thursday, December 30, 2010
Wednesday, December 22, 2010
Handmade Christmas cards finished

Three days of crafting and my handmade Christmas cards are finished. Now to hope that I made enough to send to family and relatives out of town, as well as, for our church family. I feel crazy at this time of year and lots of my friends tell me I am "nuts" for doing this, but I just love to give everyone a handmade card. It is like giving a piece of myself to the recipient. I hope they open it and feel the love that I put into each and every card. This year was harder than most because I "lost" my creative juice so overwhelmed with end of the semester duties and the craziness of everything my family had going on as well. But here they are all 63 handmade cards. I will upload a picture of each kind with a description. Merry Christmas.
Tuesday, December 21, 2010
For unto you
 This is a set I ordered last January for my birthday from Clear Dollar Stamps, it is called For Unto You. It is a set of 17 images and sentiments. The sentiment I chose to use on the front of the card is In the City of David by Paper Inspirations. I chose to color the image with the few Copic markers I own, still trying to learn the art of shading. I used Kraft cardstock for card base and folded it in a 3/4 fold with image extending from smaller side to larger side. I used Antique Linen Distressing Ink to ink around images. Thanks for looking and remember the real reason for the season, our Savior's birth.
Monday, December 20, 2010
Christmas tree flourish

Here is a 4" square card I made using Inkadinkado Holiday Silouettes clear stamp set.
Paper: white card stock, Georgia Pacific; Burgandy cardstock, The Paper Studio
Stamps: Holiday Silouettes (tree,sentiment), Inkadinkado
Embellishements: half pearls, Recollections; gold ribbon, Decorative ribbon by Real Home (purchased at end of Christmas season at Sam's Club last year)
Ink: old olive, cranberry crisp, Stampin Up!
I made the bow with the Ultimate Crafter's Companion. Very easy to make a double looped bow using the pegs.
Thank you for looking and have a great day. Will try to post more cards later.
Hello again!
Hello, I have been so busy lately with work, family, and ministry that I have not had much time to craft. I don't know about you, but I really need that time for myself to help balance out the other things that life throws at us.
Here is a picture of a little squirrel that my son saw out our front window the morning of our first snow. It is so amazing what God will share with us if we take the time to "Be still". This little squirrel was perched on our corn ledge eating acorns. When he finished he would run down and burrow his head in the snow, repeatedly until he came up with another acorn. My son "collected" acorns and wanted to now share his collection with this little squirrel who was working so hard to find a nut. We threw some of our acorns out to the squirrel, but he ignored them and went about searching his way. It really was a beautiful sight and it reminded us that God provides for all the creatures, so how much more does He want to provide for our needs. We get so busy at this time of the year that all to often we do not stop to "be still and listen to that small voice" , but if we do we can be calmed and reminded that He loves us and wants to care for us. This holiday season take time to stop and listen to what God is trying to tell you.
I will be posting some card creations as I finish them, so please check back.

Thursday, October 21, 2010
Time for Tea- Get Well Soon

Hello everyone. I think I told you that I make cards of encouragement for my church, well recently I was asked to take off the embellishments that "stick up" on the card because our post office was charging 20 extra cents to process the cards by hand. I didn't think I added too much stuff on these cards, but anyway I am now just making some CAS cards now. I chose the Time for Tea set from PTI. I had purchased this set with the teacup die and wow how easy was that. Die cut the teacup and stamp image on top of the die. It lines up beautifully. I used really rust and old olive ink, Stampin' Up!
Please let me know if you have experienced anything similar at your post office when sending your hand crafted creations. I know the above card is a bit bland without the embellishments, but I am sure that it will still encourage the recipient.
Have a great weekend.
Thursday, October 14, 2010
Musical Butterfly- Get Well card
 I made this card for a sweet lady in our church who had just undergone emergency surgery. She is very musically talented, so I thought the image was cheery and appropriate.
I purchased the butterfly image at a local stamp store, not sure who the image is by. The store owner had taken large sheets of unmounted stamps and cut them apart and packaged them for individual retail. I liked the butterfly with the sheet music. My daughter plays the piano and we have occasions to give gifts to her piano teacher and I thought this image would be cute.
Stamp: butterly with sheet music, source unknown; sentiment, PTI
Ink: close to cocoa, Stampin Up!, antique linen, distress ink
Tools: Music embossing folder, Cuttlebug
Embellishments: turquoise and brown striped ribbon, Michael's
Techniques: distress inking. I purchased the sponge pads to go on the Tim Holtz' inking handle and I just love it.
Please let me know what you think. I appreciate the comments. Have a great weekend!

Friday, October 1, 2010
Bandage -Feel Better Card
 I saw this cute design in one of my Paper Crafts magazines and had to give it a go. I cut two rectangles out of tan cardstock, rounded the corners and stamped a dot background in close to cocoa (Stampin Up!) ink, I punched a 3/4 inch square and stamped the heart from (All about U, Stampin Up!) in real red (Stampin Up!) ink. I used a piece of olive green textured cardstock (DCWV) and faux stiched edge and outlined in white gel pen (Sakura). Stamped sentiment (Up, up, and away, PTI) in close to cocoa ink.
I thought it turned out very sweet and could be used for a male or female get well card. I would love to hear from you, please leave a comment. Have a great weekend.
Saturday, September 25, 2010
PTI September Blog Hop- Larkspar Wedding card


This month's Blog Hop was to make a card from inspiration or technique learned from someone else's blog. I chose my friend Sara. http://theunhurriedlife.blogspot.com/2010/09/happy-birthday-nadine.html
Sara is an amazing card maker. I loved the card she made for Nadine's birthday and I wanted to give it a go. I stamped the Larkspar (PTI) image in cloud white chalk Versa Magic ink, and colored the image with colored pencils. I added some sparkle with a purple Sakura glitter pen. It looks very elegant in person, but I don't think you can see the glam in the photo. I wanted a very elegant card for a young couple who were recently married, so I added the Mr and Mrs sentiment to the bottom of the card. Since it was a wedding card I did want a little bit more Wow, so I added some sheer black ribbon, JoAnn Craft Essentials around the image tied in a bow and added a half pearl, K and Companyto center.
Please let me know what you think, I just love to receive your comments. Enjoy the hop and enjoy your weekend.
Wednesday, September 22, 2010
Color block leaf card

I saw a card very similar to these in a card magazine and had to try it. I always struggle with making masculine cards but I thought both of these cards could pass as masculine.
I cut rectangles of colored cardstock (old olive, more mustard, close to cocoa, and kraft, Stampin Up!). I used turning over a new leaf stamp set (PTI). A different leaf stamp for each card. I stamped the image in versa mark and clear embossed. Stamped sentiment and added felt embellishments
I used the small rickrack die (PTI) on bottom card.

I used the small rickrack die (PTI) on bottom card.
Thanks for looking, hope you have a great week.
God Bless
Friday, September 17, 2010
Get Well Soon, MFT


Hello again, it's Friday.
I am once again exhausted by my new schedule. Hopefully I well get used to it and won't feel like I have been hit by a Semi on Fridays. Well, to the cards. I once again was practicing with my "limited" collection of Copic markers. I do not own any skin tones. I had seen a card sample in the MFT booth at CHA, where the artist only colored certain items on the stamped image, so I tried that for the first card, only using my red Copic marker (R89). I cut out a red heart and other red embellies (red scallop matte, red grossgrain ribbon). I thought it still looked very sweet. The dp is DCWV. The second card I colored all except nurse bag and skin (don't own black or skin tones). I added the heart to the sentiment oval. I rounded two corners of the matte and image and used the Fiskars border punch.
I just loved these Pure Innocence sets by MFT. This one is called Best Medicine. I make many of the cards that are sent out within my church as a ministry. We send out a lot of thank yous, thinking of yous, baby cards, and get well cards. I will keep playing and practicing with the Copics.
Technique tip:
I was excited to see the tutorial at www.splitcoaststampers.com this week with Beate Johns. She demonstrated how you could use your Copics combined with your colored pencils. You lay down the foundation color with your Copics and shade with the color pencils. I have a lot more colors of pencils than I do my Copics, so I will have to try this new technique. She does recommend that you not use your Copics after using your colored pencils on your image because the wax in the pencil could ruin the nib on your Copic marker. Check it out, it is this weeks tutorial.
Have a great weekend and please leave me a comment, I would love to hear from you.
Friday, September 10, 2010
Tree Swing-MFT

I bought this set at CHA from My Favorite Things. It is their Pure Innocence line and the set is called Tree Swing. I just loved the little boy and I do not have too many masculine sets, or sets with boys, so when I saw this sweet set I was naturally drawn to it.
I colored the image with Copics and used a sponge and mellow moss and brocade blue inks (Stampin Up!) for the background. I used a corner rounder for the edges and added some 3/4 inch circles for some interest behind the main image. Just sweet and simple card. With God's help we can "hang in there". Have a great day!
Thursday, September 2, 2010
July FOM-Larkspar: Take Two

I made a second card using PTIs FOM set- Larkspar. I loved this set when I saw it in person at CHA, so guess what, I had to buy it.
I cut the oval out of Georgia Pacific white cardstock. I have looked at a lot of videos on using Copic markers and about half of the people recommend this cardstock for blending the colors, others recommend Gina K cardstock. It was easier for me to go to Wal Mart and buy a ream of the GP, so that is what I use when I am going to color with Copic markers. On this card I chose to color all the flowers yellow and then I outlined the flowers in gray. At first I was frightened that it would look horrible, but I actually like the way it looks and it gives the image more dimension. I know I definately need more practice, but I am pleased with the way this image turned out. I used Mellow moss cardstock, Stampin Up! for the strip, ran it through the script Cuttlebug embossing folder and tied a yellow ribbon around the middle. I also pop dotted the matted oval for more dimension.
Just a CAS card, practicing my coloring skills. Let me know what you think and have a blessed day.
Wednesday, September 1, 2010
July-Flower of the Month Larkspar
 I am still trying to get the coloring and shading down with Copic markers. Practice, practice, practice..... I went online to find out what colors Larkspars are in nature and they can be pinks, purples, whites, and yellows (maybe they can be other colors as well, but that is what I found in my search). I chose to color mine with purples and yellows and greens for the stems.
Paper: white cardstock, Georgia Pacific; green and yellow cardstock, DCWV; purple cardstock, The Paper Company
Ink: Tuxedo black, Memento
Stamps: July FOM- Larkspar, PTI
Tools: Swiss dot embossing folder, Cuttlebug; oval and scalloped oval, Spellbinders Nestabilities
Embellishments: cotton twill, natural; purple button
Thanks for stopping by, please leave me a comment and let me know what you think.
Have a blessed day.
Sunday, August 29, 2010
Paper bag flower card-click here to view video

Hello everyone. I would like to thank everyone who took time to comment on my gift card holder for the PTI blog hop. I really enjoy hearing from you all, I also like seeing everyone's creativity. One of the ladies who won made a paper bag flower, it was quite beautiful, so I wanted to give it a go. I went to her link to watch the youtube video which I have included. Just click on title and you can see for yourself how quick and easy these flowers are to make. I made several of these flowers out of a brown paper lunch bag. This is one of the CAS cards I was able to make with a pre-made card base by DCWV.
I added some shimmer mist to the flower and the sentiment is from the Laskspar-FOM set PTI. I used a Fiskars border punch for the tag.
Thanks for looking. Please let me know what you think.
Wednesday, August 25, 2010
PTI August Blog Hop- Paper Bags


 Hello Everyone, it is that time of the month again, the PTI blog hop. This month, the challenge was to create something using a brown paper bag. I have made paper bag albums in the past and have even created a paper bag program for a Women's Retreat. I wanted to keep in the theme of back to school, so I thought of a gift card holder for a teacher. I used a #2 Kraft paper bag 4 x 2 x 7 3/4.
Paper: Ivory, The Paper Company and dp (unknown)
Ink: Chocolate chip and Ruby red, Stampin Up!; antique linen distress ink, Tim Holtz
Stamps: All Booked Up and It's Official, PTI
Embellishements: Twill tape, natural (JoAnn fabrics); chocolate button, PTI
Tools: Bookplate die, PTI; label die, sm, Spellbinders, 1 1/2 inch circle punch, scallop border punch, Fiskars
This size bag is perfect for making gift card holders. It was super quick and easy. I hope you enjoy your evening looking at everyone's wonderful creations. I really enjoyed playing with these two sets, I have not had a chance to play since returning from CHA.
Please leave me a comment , I enjoy hearing from all of you.
 , I enjoy hearing from all of you.
Thursday, August 12, 2010
Celebrating 19 years

Hello fellow bloggers. Where has the summer gone. I have been frantically trying to get things ready for everyone starting the new school year. My husbands school year has already begun, my children's school year starts next week, and mine the week following. I say this because this time of the year is crazy, but 19 years ago when my husband and I were married, this was still part of our summer break. Now our anniversary is part of the beginning of the school year. Seems crazy, we schedule our wedding at this time thinking we could celebrate before starting a new school year. This year my husband had open house on our anniversary. Knowing that he would not be home for dinner, the children and I made him a special dinner and dessert the night before to surprise him. So on our actual anniversary I did not expect him to bring home these beautiful flowers. I was very surprised. The kids asked "why did daddy bring you flowers?", forgetting that it was our actual anniversary. See we already celebrated the night before, so to them it was over. Despite all the craziness, the Lord has blessed us with 19 years and three beautiful children and I pray He bless us with many, many more years.
Have a great day and count your blessings among the craziness of your day.
Thursday, July 29, 2010
Tag for CHA
 I am getting very excited as I get ready to leave for Chicago to attend CHA. This is the tag I created with my online avatar for my backpack. Sorry I already attached it to the backpack (polka dot background). I used PTIs Everyday Button Bits for bird and sentiment. I cut a paper button (PTI dp) using a Sizzix die. I punched a few flowers with SU punch and added a bit of bling. The photo was taken many, many, moons ago so I thought I should help people recognize me from the blogosphere. I am sure that I will be like a little kid in a candy store (we have recently had some experience with this) and want one of everything I see. I pray that I will show some restraint.
 Sunday, July 25, 2010
Papertrey Ink- July Blog Hop: Office Supplies

Hello Everyone! It is that time of the month again where we get to play with all our paper supplies and make something fun. This months Blog Hop we were asked to create something using office supplies. So I chose to create two birthday cards, one feminine and one masculine. I made the paper clip embellies on the first card using an out dated calendar, in which I punched 3 small flowers using a Fiskars punch and a silver brad. I curled up the petals of the flower to give more life. I also used these small flowers as the center of a corkboard flower, cut using the Daisy Sizzix die, because what office does not have a bulletin board.
I used PTIs Bitty Baby Blessings dp to create a small file folder and PTIs Bird Watching stamp set for the sentiment. I stamped the background paper (Mellow moss, SU) using a stamp from Hampton Arts. I used Martha Stewart XL border lace die in More mustard (SU) and mellow moss grosgrain ribbon. I took a few tighter shots of the embellishements.


This is the masculine version below. I substituted stars where the flowers were above. I again used PTIs Bitty Baby Blessings dp for the file folder, more mustard (SU) background paper, PTIs Bird Watching stamp set for sentiment, binder clips, green twine, and a cork star with a faux push pin made from a circle of the dp. I added a piece of green crimped paper for some texture and visual interest. I have trouble with masculine designs, so this one looks a bit plain to me, but typically guys do not "go for all the frills us ladies go for". Please leave me a comment, I love to hear what you have to say. I am also very excited about going to CHA and hope to meet some of you there. Thank you and enjoy the Hop!


This is the masculine version below. I substituted stars where the flowers were above. I again used PTIs Bitty Baby Blessings dp for the file folder, more mustard (SU) background paper, PTIs Bird Watching stamp set for sentiment, binder clips, green twine, and a cork star with a faux push pin made from a circle of the dp. I added a piece of green crimped paper for some texture and visual interest. I have trouble with masculine designs, so this one looks a bit plain to me, but typically guys do not "go for all the frills us ladies go for". Please leave me a comment, I love to hear what you have to say. I am also very excited about going to CHA and hope to meet some of you there. Thank you and enjoy the Hop!


Wednesday, July 14, 2010
You're so very tweet- Window Embossed Card
 I tried a new technique of creating an embossed window for the image.
Stamps: Bird Watching, PTI
Ink: Tuxedo black, Memento
Paper: Ruby red, Stampin Up!; blue, The Paper Company; light blue, DCWV
Techniques: Cut out window in blue with Spellbinder oval die, cut out scallop oval in Ruby red with Spellbinder die; colored image with Copic markers
Tools: tag die, Stampin Up!; swiss dot embossing folder, Cuttlebug; Spellbinder dies
Embellishments: white grosgrain ribbon, Stampin Up!
Hope you enjoy. Have a great week. Please leave me a comment.
Sunday, July 11, 2010
Stitched Bird Baby Card
Hi everyone,
I have been MIA for a while. It is Fair time and we are working very hard to get all the 4-H projects completed and ready to be turned in this week. Every year we say we will start them all earlier in the year and every year we are working up to the last second. This year actually has been calmer than past years, but still very busy. I hope to be able to post some new creations thoughout this week.
Here is a baby card I made for some friends who are celebrating the arrival of their sweet new bundle of joy. After the PTI Blog Hop, where I stiched the apple, I realized this technique was not as hard as I thought it would be so here is a second attempt. I used a stich-on template kit that I bought on clearance from Michaels by K and Company. I had bought some stiching templates a while back from OTC and their template did not have holes and I am not sure how to go about creating holes that are not too large. If anyone has any ideas please leave me a comment below.
This card otherwise is fairly straight forward. The sentiment is from PTIs Bird Watching set. I used the Fiskars border punch at the bottom of the card. I punched a flower out of dp and placed a PTI button in the center.
The fingers are my sweet son's. I had remembered as we arrived to give the gift that I did not take a photo of the card, I did have my camera with me so my son held the card and voila.
Thank you for stopping by and looking and I would love it if you would leave me a comment.

Friday, June 25, 2010
Welcome to the June Blog Hop with Papertrey Ink. This month we were supposed to come up with our favorite PTI color combo. I chose white, melon berry, spring moss, simply chartreuse (felt), and dark chocolate.
What woman would not like a little chocolate with anything? I loved these colors together. This was a fun challenge. I made two different cards utilizing the same color scheme.
What woman would not like a little chocolate with anything? I loved these colors together. This was a fun challenge. I made two different cards utilizing the same color scheme.

I used my new hodgepodge paper pack. Specifically the Everyday blessings and Pink patterns. I also used the simply chartreuse felt for two of the leaves and the Spring mix buttons (melon berry, spring moss) and dark chocolate buttons. I punched flowers out of the papers. I also used my absolute favorite stamp set, Everyday button bits. I received all my goodies the day after the last blog hop and finally got to use everything. Below you will find a close up pick of the flowers and the details.
 I used pop dots to pop up the flowers. I cut the felt with my paper cutter and large scallop blade. Wowie, the felt cuts so beautifully with whatever (paper cutter, scissors, die cutting machine ect...). Please leave a comment and let me know what you think. Have fun being inspired.

 I used pop dots to pop up the flowers. I cut the felt with my paper cutter and large scallop blade. Wowie, the felt cuts so beautifully with whatever (paper cutter, scissors, die cutting machine ect...). Please leave a comment and let me know what you think. Have fun being inspired.
I chose the same color scheme as above: white, melon berry, spring moss, simply chartreuse (felt), dark chocolate, with a touch of aqua mist. This card was inspired by a sweet baby outfit. I hand sewn the apple onto a scallop square. I used PTI simply chartreuse felt for the inside of the leaf and label. I used brown flock for inside of stem. I used PTI Everyday blessings , Pink patterns and chocolate remix dp, and melon berry, spring moss, and dark chocolate buttons. See below the close up pic for details. I popped up the flowers and added coordinating colored string (for making friendship bracelets) in centers of buttons.

Close up view of details of apple. I hope you have a great time at the hop. I would love for you to leave me a comment.


Close up view of details of apple. I hope you have a great time at the hop. I would love for you to leave me a comment.
Thursday, June 24, 2010
Wart's Up? Frog Card
 Here is a cute card I made for a friend who is volunteering at a Christian camp for the week and I wanted her to know that she was thought of and loved.
Paper: white cardstock, Georgia Pacific; glittered dp, Baby Girl Debbie Mumm collection; yellow and green cardstock, DCWV
Stamps: Pond Pals, Clear Dollar Stamps
Ink: Tuxedo black, Memento; Buckaroo blue and Mellow moss, Stampin Up!
Techniques: colored image with Copic markers, used scallop template and sponged on blue ink to create clouds, added ground color with mellow moss ink; used Cuttlebug Swiss dot embossing folder for yellow cardstock; Spellbinders Labels one for image and matte; covered mushroom and frog with glossy accents
Hope you enjoy your day and thanks for looking.
Sunday, June 13, 2010
Card box- 2nd version


Here is a second version of the card box. This time I used a second piece of cardstock for inside pockets and a small piece of dp to accent the pockets.
Hope that everyone is enjoying what summer has to offer. I hope to post soon some bracelets that I made with scrapbooking supplies. Have a great day!
Friday, June 11, 2010
A2 card Gift Box as featured on Splitcoast Stampers


This cute A2 card box with place for tags, 3 X3 cards, pen, notepad and stamps all in a small, sweet package is this weeks feature on http://www.splitcoaststampers.com/ tutorial. This box makes a great bonus gift for anyone who loves handmade cards. It will hold between 10-12 A2 cards and envelopes, plus 6 3X3 cards and envelopes and several tags. I rounded my corners for a more finished look. (I personally liked the way it looked better). I used 2 pieces of cardstock (base and inside pockets) and one piece of dp (lid, cover of notebook and stamp envelope, pen loop). I embellished the edge of the lid with ribbon and covered where the ends of the ribbon met with a flower embellishment. Thank you for looking, please let me know if you have any questions. I appreciate any comments I receive.
Wednesday, May 26, 2010
Thank you
I just wanted to say thanks to all who visited my blog and left a nice comment. I wanted everyone to know all my new PTI goodies arrived today safe and sound. I can't wait to get the stamps inky. Have to think of what to do for teacher gifts. Thank you all again, it was fun to play along.
Tuesday, May 25, 2010
Better view of May PTI blog hop post- Felt
 I went back to look at post and realized I had zoomed in too much and you could not see the white edges of the card. I just wanted to post a better view of the card.
Thank you for all your kind comments. I love to hear from you all and to see all your creations as well. Have a great night.
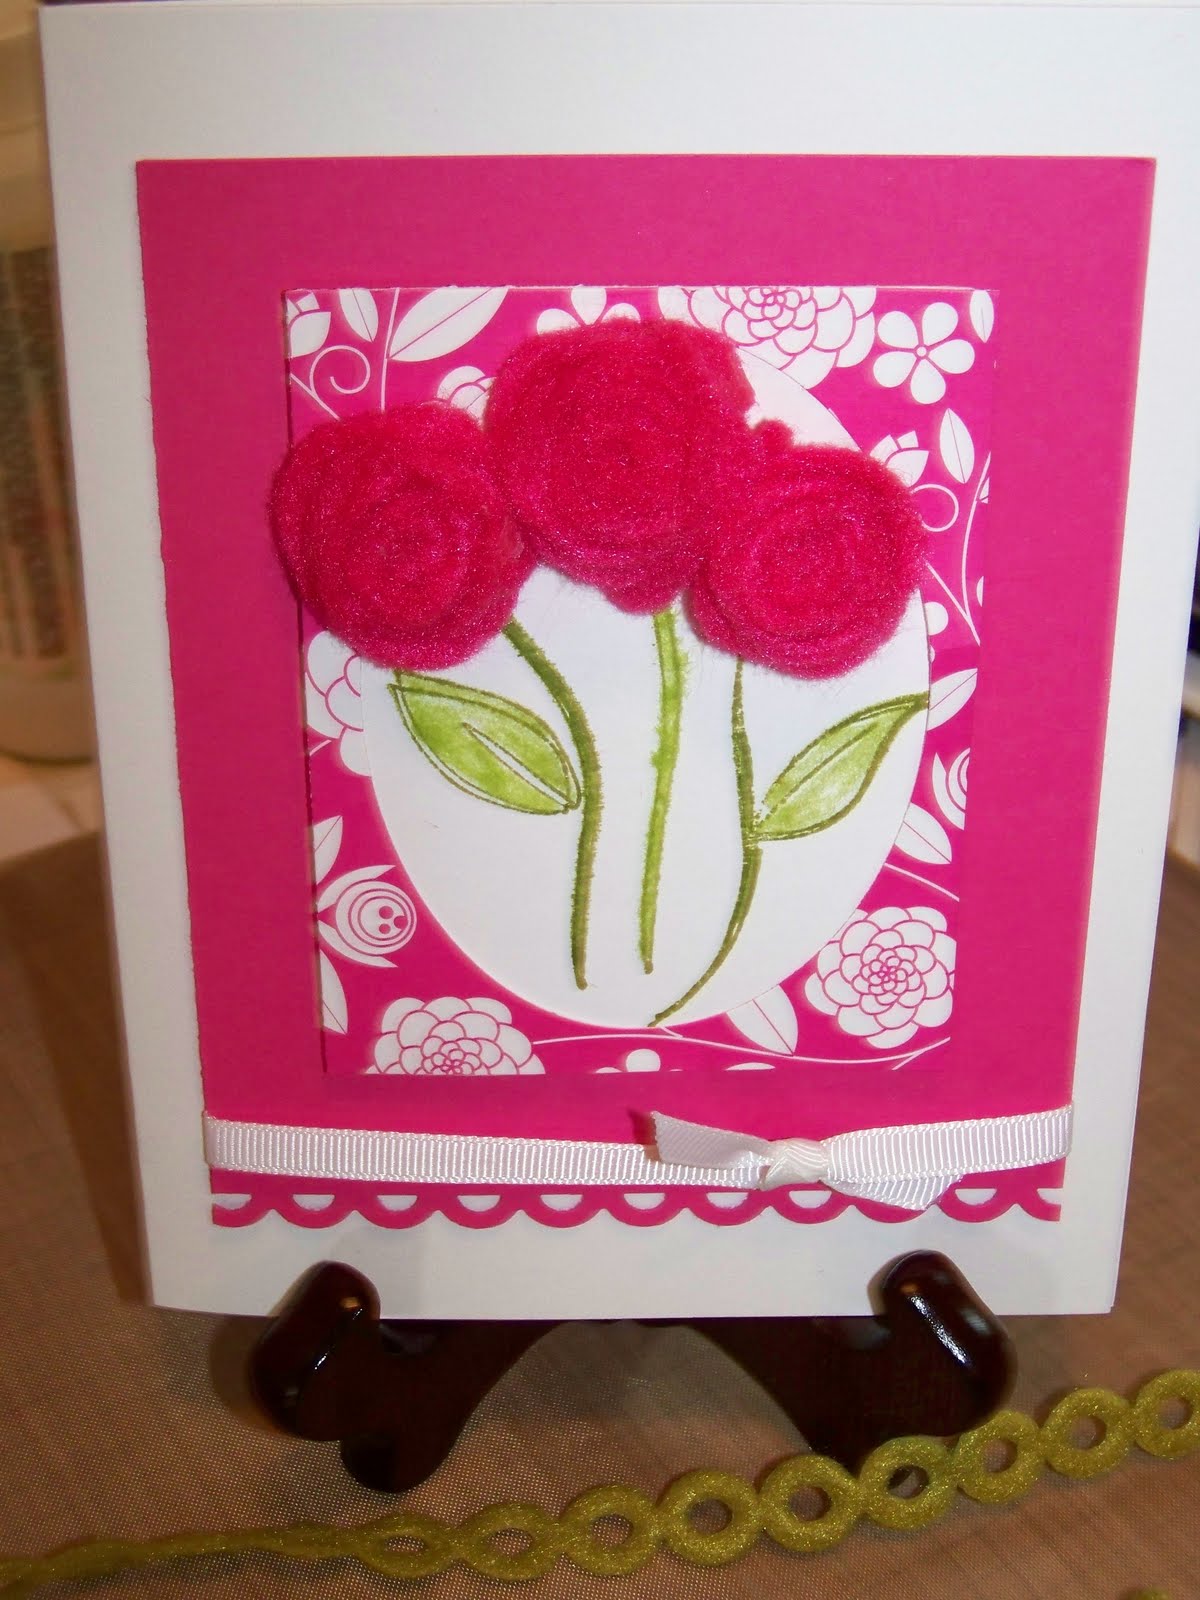
May Papertrey Ink- Blog hop using felt

 Here is my creation for the Papertrey Ink May Blog hop, using felt. I had placed an order for my own "goodies" to use in the hop, but sadly I am still waiting. So I had a piece of Raspberry fizz cardstock and a scrap piece of raspberry mix dp that already had an oval cut out of it. I went into my felt stash and found a piece that matched the papers and cut a several small squares and rounded the corners of the squares (you could also use a circle) and then from the outside edge I cut a spiral into the felt until I reached the center. I started rolling the felt from the outside to the inside. I wound the first 3-4 layers very tightly to form the tight center and then I started to roll edges over as I went around the center (to form the petals). This was my first time using felt to form roses, but I am pretty happy with them.
Paper: Raspberry fizz cardstock, Raspberry mix dp, Papertrey Ink, white cardstock base, The Paper Studio
Stamps: Petals from Scratch, Fiskars
Ink: old olive, Stampin Up!
Tools: border punch, Fiskars
Embellishments: felt (handmade) roses, white grosgrain ribbon, Stampin Up!
Technique: flocking on leaves and stems, Martha Stewart flocking powder
Please let me know what you think. Hopefully my order arrives soon, so that I will have "goodies" to use for next months hop. Enjoy your evening everyone!
 Here is a close up view of the felt roses and the flocked stems and leaves.
Saturday, May 22, 2010
Feel Better Soon

For our churches card ministry we send out lots of thank you cards, thinking of you, baby cards, sympathy, and get well cards. So here is a clean and simple get well card that I feel could be both masculine or feminine. I don't know about the rest of you, but when it comes to making a masculine card I freeze, total creative block. I am trying to work that creative "muscle" more, but it is much easier for me to create a feminine card.
Post a comment on how you make a card more masculine.
Paper: moss green, Stampin Up!; dp, Cafe Mediterranean, DCWV
Stamps: Sentiments, American Crafts clear stamps
Ink: orange, Stampabilities Dye ink; Close to cocoa, Stampin Up!
Tools: ovals, Nestablilites; paper piercer and mat, Stampin Up!, metalic pens gelly roll, Sakura; corner rounder, EK Success
Embellishments: twill ribbon
Technique: I had uneven coverage on the sentiment, so I went over it with a brown glitter gelly roll pen and then decided to carry it over to image by adding a small dot in each "bud"
Wednesday, May 19, 2010
Thanks a latte
Staying with my drink and food theme, I thought I would share this simple card using the Fiskars clear stamp set, Latte love. I practiced using my new Copic markers to color the image. I have read from many of the "seasoned" Copic users that Memento ink is the best for stamping images that you want to color with Copics. The image does not bleed and dries quickly without needing to be heat set. I used Tuxedo black ink, but I have read that you could use any Memento color and achieve very good results. I had clear gems and I colored them with my blue copic marker tha I used to color the coffee cup, now I have matching bling, how awesome is that. I hoped that the bling would not be too much if this card was sent to a man. Let me know what you think. I need to keep practicing coloring, but I do like how this turned out. You cannot see it very well here, but I used my clear glaze pen to go over the coffee to give it a realistic sheen. Well have a great day and I hope you have had some time to "play" with your supplies today :)

Tuesday, May 18, 2010
You're so SWEET!
 Here is another Clean and Simple card that I made for our Church ministry. I love this stamp set by Fiskars. I stamped, colored, and cut out each scoop of ice cream and used pop dots to raise up each scoop higher than the first.
Paper: chocolate chip, Stampin Up!; white cardstock, Georgia Pacific; patterned paper, DCWV
Stamps: Cupcakes and more, Fiskars
Ink: Tuxedo Black, Memento; Close to Cocoa, Stampin Up!
Tools: Label punch, McGill; Copic markers, white gel pen, pop dots
Monday, May 17, 2010
You're tea-fiffic
It was time to get creative and make some cards for my church again. I have been busy and if I do not have a deadline I can find 101 things to do around the house other than create. But I am sure I am like many of you who need the creating as a sort of therapy. It is very therapeutic for me to create a card and step away from my other roles for a little while. I stumbled upon some "how to" videos at http://stamptv.ning.com . I had purchased a Spellbinders Impressabilities Circles template a few months ago and had not "played" with it much and I saw Gina K's video and I pulled it out to play. This is the card I came up with. Paper: Chocolate chip, Stampin Up!; pink textured cardstock, DCWV; white cardstock, Geogia Pacific
Stamps: Latte Love, Fiskars
Ink: Memento, Tuxedo black, Chocolate chip, Stampin Up!
Tools: Spellbinders Impressabilities Circles (as a stencil for background), Labels one, Nestabilities
Technique: colored image with Copic markers and glaze pen and used silver paint pen for the spoon
I love to receive comments, please let me know what you think. I will be posting the other cards I created soon. Thank you and have a blessed day.
 Paper: Chocolate chip, Stampin Up!; pink textured cardstock, DCWV; white cardstock, Geogia Pacific
Stamps: Latte Love, Fiskars
Ink: Memento, Tuxedo black, Chocolate chip, Stampin Up!
Tools: Spellbinders Impressabilities Circles (as a stencil for background), Labels one, Nestabilities
Technique: colored image with Copic markers and glaze pen and used silver paint pen for the spoon
I love to receive comments, please let me know what you think. I will be posting the other cards I created soon. Thank you and have a blessed day.
Subscribe to:
Posts (Atom)