Thursday, December 19, 2013

Inspired Stamps DT Thursday

 Hello Everyone.  Christmas is next week.  How many of you are still trying to "craft up"  some Christmas presents?  I am.  Every year I tell myself I will be ready and not doing things at the last minute and guess what?  Every year I am doing stuff at the last second, not even the last minute.

I have posted these Chipboard houses before, but I loved them so much I made several versions to give to my sweet friends.  I used the Label Maker verses stamp set.  I used the individual words for the roof and ground.  I painted the chipboard with distress stains by Tim Holtz and the flowers were also cut from a Tim Holtz die.  The bird was a punch that I dyed as well with the distress stains.  I love these cute pieces of inspiration.

I also made more wreath ornaments using the Vintage Christmas set, inked, added greenery around the edge (Martha Stewart punch) and red sequins for the berries and various red ribbons on top.  These are fantastic teacher gifts (school, Sunday school, AWANA etc...).  Each wreath ornament is double sided, so you have image on front and verse on the back.  I love them.  I hoped I have inspired you to make some blessings for those around you this holiday season.  Make sure to check out the other fabulous DT creations and the Inspired Stamps blog.  Remember if you have a crafter on your list, getting them a gift certificate to the Inspired Stamps store so they can purchase their favorite verses and images would be a great gift.


Thursday, December 12, 2013

Inspired Stamps DT Thursday

Here is a winter card (Christmas card) that I made with two Inspired Stamps sets.  1.5 inch circle Christmas and Ask, Seek, Knock.  I colored the tree from the Ask, Seek, Knock set with Copic markers and then added glittery snow medium and let dry.  It gives a 3D look of snow, unfortunately the picture doesn't do it justice.  We have had lots of snow here and very cold temperatures, so that was my inspiration for the card.  I hope you all stay warm and have a blessed day.  Please check out the other DT member creations at their blogs or at the Inspired Stamps blog.

Thursday, December 5, 2013

Inspired Stamps DT Thursday

 I hope everyone has had a wonderful Thanksgiving holiday with their family and friends.  We did.  We had a wonderful dinner and time of fellowship.  I am a bit under the weather so I went for a clean and simple card, using a pre-made window card.  I chose to use heart holding girl HLO and Proverbs 3:5 2 X 2 scripture.  I stamped the girl in Memento tuxedo black and colored with Copic markers.
I hope you all have a blessed day.  Please be sure to check out the other DT cards and creations for this week.

Thursday, November 14, 2013

Inspired Stamps Thursday DT

 Today I used one of the stamps from last week's November Release to make a gift card holder.  'Tis the Season to be thinking about Christmas cards and gift card holders.  Gift cards are becoming quite popular due to the fact the recipient can pick out their own gift and you do not have the tremendous shipping costs.  I have to admit I like to receive gift cards but I still love receiving something someone has thought about me and picked out.
I found this particular matchbook gift card fold at songofmyheartstamps.typepad.com.  I liked it because you can make four gift card holders from one 12 X 12 piece of cardstock.
How to:
Cut a 3 X 12 inch strip of cardstock and score at 3.75, 8, 8.75 and 9.5 inches.  Punch a shape out of holder side (I used 1.25 inch circle punch).  This will allow you to easily grab the gift card out of holder.  Then add thin strip of sticky strip (it needs to be thin so you have room for your gift card in the "envelope".  Also add thin piece of sticky strip to bottom of the matchbook fold near the lower edge (needs to be at the lower edge so top flap can easily tuck in to close card).
Card is finished, very easy.  As I said you can get 4 of these from one 12 X 12 piece of cardstock.  I made a minor adjustment to some of the others I made. This version has a flat flap, but if you are adding anything with a bit of bulk (say you want to add the gift card to a tag with a ribbon pull) then I added another score line at 4 inches.  I used all the same score lines as above but added an additional score line at 4 inches and this gives the "traditional" matchbook look.  The flatter version would be much easier to mail, since it is flat.  The second version would be better for hand delivery.
I hope you have a blessed day.  Thanks for stopping by and I hope you find this tutorial helpful.  Please be sure to drop by the Inspired Stamps blog to see more beautiful creations by the design team and Jamie's tutorial from Wednesday on how to creatively wrap chocolate bars for gift giving.  Also be sure to find this stamp and all of the new releases and so much more at the Inspired Stamps Online Store. Currently their is a coupon to celebrate Inspired Stamps 3rd Birthday, so hurry so you don't miss the savings.

Friday, November 8, 2013

Happy 3rd Birthday Inspired Stamps-faux letterpress tutorial

Hello everyone.  Did you see the Inspired Stamps new releases yesterday?  How about Deneen's tutorial on embossing with Spellbinder dies on Wednesday?  Well, I have seen that technique on many cards and loved the look but was not sure how to achieve it, until now.  Deneen had showed how to emboss with a Cuttlebug and I have a Big Shot so I tried the the technique with my machine.
 Open the multipurpose platform to Tab 1 and add cutting plate, cardstock, die, embossing matte, embossing plate. Proper Sizzix Sandwich: Later I tried again and altered the sandwich from what you see in the picture:  Tab 1, cutting plate, die, cardstock, embossing matte, embossing plate.  This will work much better.  Voila.  I will be trying this out in the future.  Thanks Deneen for the tutorial.
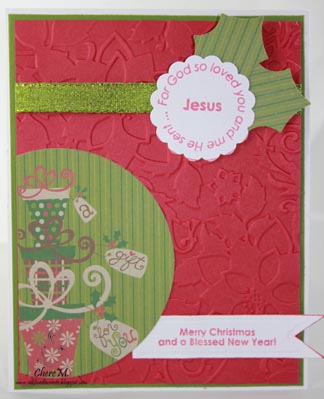
 I decided to stay with the embossing, but show how to do a faux letterpress.  I love to use my embossing folders to create background designs, but we can take this a step farther by inking the embossing folder on the flat side with a water based ink (tumbled glass Distress ink used here).

 Ink the flat side of folder (without raised image) by swiping with the ink pad to cover completely.
 Add cardstock and close folder and run through machine. Sandwich: Tab 1, cutting plate, embossing folder containing cardstock, second cutting plate.
 Here is the finished design.  The flat parts of paper are now colored in tumbled glass and the snowflakes are embossed and still white (original color of cardstock).
Clean up is quick with a baby wipe or the embossing folder can be washed in the sink with warm soapy water.  The water based inks wash completely off folder, no staining.  I am not sure how pigment inks or chalk inks would work in this technique, if anyone has tried other types of ink please leave a comment and let us know how it worked out.
 I used a music embossing folder and antique linen Distress inks.  This time I wanted to stain the embossed image as well, so I used walnut stain Distress ink and the sponge applicator.  I applied ink by starting off image and moving the applicator in a circular motion.


 I wanted a really distressed image, so I crumpled the paper in a ball and then smoothed out again. My son said, "Mom, why did you turn that paper into a wadded up tissue?"
I admit at this point it does look a little rough, but I love the final results.
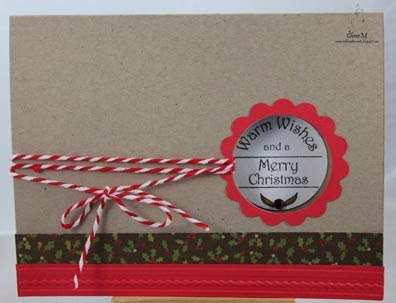
 I used the new release Winter Sketches and added a satin ribbon.  I colored the images with Copic markers.  I had colored four of the holly leave images and was playing around with placement when I noticed  a "flower" emerging when I placed them together.  I added red Stickles and had the Cardinal sit in the cluster.


I matted the snowflake background on a white piece then a black piece.  I tied a ribbon around and then finally adhered it to the card base.  I used the sentiment and the images from Winter Sketches.  I hope you try this technique to make some interesting backgrounds for your cards.  Remember that the new releases are available later this afternoon in the Inspired Stamps online store and there is a nice coupon to celebrate Inspired Stamps 3rd Birthday.  Please be sure to check out the Inspired Stamps blog for more tutorials.  Have a great day.

Thursday, November 7, 2013

Inspired Stamps November Release

 Hello and welcome.  Inspired Stamps has several new releases just in time for the holidays.  You will need to check out the Inspired Stamps blog for all the new sets to be released this Friday in the Inspired Stamps store.  I have used the new set called Me and My House, this set has lots of sketch images (I did not use them all in my card).  You can use these stamps to "create a scene".  I used the large house,windows, heart, grass, girl, mailbox and home sweet home sign. I colored the images with Copic markers.  On the inside I used Joshua 24:15 and cut and matted it with Spellbinder dies.
I popped up the Home Sweet Home sign and added a red strip that I embossed and inked with white die to match the girls dress.  I used glossy accents on the heart.
Make sure to check out all the other DT designs with other new releases.  Come back and see me tomorrow and I will have a tutorial  and check out Deneen's tutorial on Wednesday.
Remember all the new releases will be available on Friday in the Inspired Stamps online store.
Have a blessed day and thanks for stopping by.

Thursday, October 31, 2013

Inspired Stamps DT Thursday

Fall is in the air and we have another Fall card for you.  I have pulled out my Cricut for the banner with the leaves and then inked it up with distress inks.  I decided to try some vintage book paper as the background.  I love books so this is sometimes difficult for me to use the book pages on projects, so I try to find books that have been well loved and now are too tattered for reading so that they can be repurposed into crafts and loved some more.  I cut some flags from the pennant Spellbinder die sets and stamped pumpkins on one and colored with Copic markers and stamped the verse, "In everything give thanks" and added a bit of burlap and a button.  What do you think?  The stamp set was Fall Gratitude and it is available in the Inspired Stamps store.  Currently there is a sale that will be going on until November 4, so stop by and take advantage.  Next week we will be posting some new release stamp sets so you will want to join us again for that.  At the Inspired Stamps blog you will find fun gifting ideas using the Inspired Stamps line, so be sure to check out those ideas and get crafting.  Have a great day and I hope you stay dry.

Thursday, October 24, 2013

Inspired Stamps DT Thursday

 Today we are getting ready for Christmas with some more cards to the long list of those needed.  I used the 1.5 inch circle Christmas stamps and punched a 1.5 inch window into the front of the card.  I then punched a 1.5 inch circle on a piece of red and green cardstock and then centered my scallop circle punch over the punched circle to create the frames on each card front.  I went through my stock of Christmas papers for patterns that I felt would complement each stamp and added a bit of embossing detail to the solid cardstock on the fronts.  I used Christmas embossing folders, that I got at the end of last season and have not had much time to play with since.  I am loving them.  This stamp set comes with 6 circle stamps and my plan was to make a card with each because it was so much fun to create these, but alas life called me back to reality.  There was kids to pick up, dinner to make, dishes to clean and other such obligations.  Why do these necessities always come around when we are busy crafting? ha ha!
I colored small bits of the stamp with my Copic markers and added some bling.  I am in love with Baker's twine so I added a bit of that as well, I need to get better at keeping it taught when I tie the bow. Uugghhh!

This above is the inside of the card 1.
Card 2:   I inked the embossed cardstock with walnut stain and was a bit better in the bow tying area.


Inside of card 2:  Again I added some bling and colored the star with metallic pens.  I stamped tree a second time with green and cut out and adhered.
Please visit the Inspired Stamps blog for more creations and the Inspired Stamps store for these stamps and many others.  Have a blessed day and thanks for visiting.

Thursday, October 17, 2013

Inspired Stamps DT Thursday

Hello, Today I have a card with this sweet HLO girl with heart, I colored her with Copic markers and added some gloss to the heart with glossy accents.  I added some interest to her skirt with the colorless blender to make the plaid and then went over it with white gel pen.  I used scripture from 1 Corinthians cut with scallop rectangle Spellbinders and used Spellbinder embossing folder for the bottom of card.  The ribbon is Martha Stewart.
Make sure to check out the other DT posts and go to the Inspired Stamps blog to see more ideas for Christmas gifts, the first two have been posted already, so if you missed them go to check them out and the third installment will be this weekend.  Check out these stamps and many others at the Inspired Stamps Store, all the Inspired Stamps are made in the USA.
Thanks for looking and have a great weekend.

Wednesday, October 9, 2013

Inspired Stamps- Thursday DT post

It is Thursday.  Fall is definitely in air.  The temperatures have cooled down and the leaves are falling from the trees.  This week the DT was asked to make Fall inspired cards, so I used the Fall Gratitude set.  I used some non-traditional Fall colors for a fresh feel.  I distressed the edges of paper with walnut distress inks.

Thursday, October 3, 2013

Inspired Stamps-DT Thursday

 Hello, the Inspired Stamps DT is back this week with a set of three "thank you" cards.  I used two sets to make my set of cards, Thinking of You and Perfect Sentiments.  I used black cardstock punched with a Martha Stewart border punch to help image to pop.  I colored the edge of the sentiment flag with Copic markers to match with the image and drew stitch lines around for extra bit of detail.  I added some Stickles with a paint brush to add extra sparkle to each of the flowers.  Much prettier in real life.  Please be sure to check out all the other DT projects and the Inspired Stamps blog for more inspiration.

Card in purple, colored with purple Copics.


Thank you for stopping by and viewing my project.  Have a great day.

Thursday, September 19, 2013

Inspired Stamps DT Thursday

Hello Everyone.  The weather has cooled a bit and the leaves are starting to turn and fall from the trees so this beautiful time of the year is my inspiration for this weeks card.  The card was to contain a HLO, so I used HLO Thankful Girl and a 2 X 2 scripture. I colored her hair and skin with Copic markers and paper pieced her outfit (green is my favorite color, can you tell :) ).  I went back into my supplies and I had this large Sizzix leaf die and I thought the 2 X 2 scripture would fit and it did.  I cut it in a yellow orange and then used distress inks in oranges, red and brown to bring out the Fall colors.  I tied a ribbon around bottom notch of leaf for more visual interest.  I mounted everything onto a piece of Kraft cardstock that embossed with the woodgrain folder by Tim Holtz.  I also added some walnut stain to bring out more life and rounded the corners.  Please let me know what you think and I hope you are digging through your old tools and designing some new creations.  I am having a lot of fun using tools that I have had since I started crafting.

Have a great week and thanks for stopping.  Please check out the other DT blogs for more beautiful creations and if you are interested in these stamps or others by Inspired Stamps please check out the online store and the Inspired Stamps blog for more inspiration.

Thursday, September 12, 2013

Inspired Stamps-DT Thursday

It is another Christmas card.  Time is ticking away and if you are like me you keep putting off making your Christmas cards and before you know it, it is time to send them out and you are scrambling to make them.  Every year I say I will do better, but I always seem to making them up to the last possible minute.
Here is a Christmas card I made with Christmas verses, Inspired Stamps but if you have the 1.5 inch Christmas circles you could use that set as well.  I found some dp that I cut a circle with my Spellbinders and had it hang off the card.  I liked it because I felt it went well with the verse.  The tags on the presents say "a gift for you".  Isn't that what John 3:16 says,  God sent his son for the whole world, "a gift for you".

I cut some holly leaves (I have had that die since I started paper crafting and it doesn't see much love.)  I think we all need to go through our supplies and see what we have and use some of those oldies but goodies.  I am definitely going to make more Christmas cards with this die this year.
I embossed  a red piece of cardstock with poinsettia folder by Sizzix and added some glitter ribbon and the sentiment from same stamp set and voila!
Leave me a comment on whether you have started your Christmas cards yet and how many you need and how many are finished.  This card makes 6 out of 60 for me, I still have a long way to go.
Have a great day.

Thursday, September 5, 2013

Inspired Stamps DT Thursday

 Hello everyone.  The leaves are starting to change colors and fall from the trees here.  At Inspired Stamps we were asked to make a card with Fall colors.  The first card I used some corrugated cardboard that I inked the edges with walnut stain distress inks, tied a bow around it and attached it to a Kraft card base.  I stamped and colored the pumpkins and sentiment from Fall Gratitude set.  I added some punched leaves for more color and visual interest.
This second card I had seen this technique around the blog-o-sphere and wanted to try it myself.  It was really easy and the results were interesting.  (I might have to try again in the future.)
I took four lengths of painters tape (you could also try masking tape)  and placed each length in a different distress ink color, placed the tape on the project, rubbed slightly and pulled off and it left an inked stripe.  I then stamped images from Fall Gratitude set and colored.  I might have added more interest if I had colored the leaves in different colors, but my brain was telling me to color them all green.  I stamped the sentiment on the tape line but I did not think it popped enough so I cut a ticket die and inked with the spice marmalade and then stamped sentiment and popped it up with foam adhesive.  This was a fun way to add some Fall colors.  I hope you enjoyed my cards and are inspired to make some Fall cards of your own.    Be sure to visit our other talented designers and see their creations for this week and visit the Inspired Stamps Blog for more fun techniques.  Have a great week.

Thursday, August 29, 2013

Inspired Stamps Thursday DT post

Hello Everyone.  I have some news for you.  Inspired Stamps is having a sale until midnight Friday, August 30th.  The sale is 20% off everything including sale/clearance items, so hurry over to the Inspired Stamps Store and choose your favorites before the sale ends.

Today we are celebrating with Birthday cards.  I used two Inspired Stamps sets, Thinking of you (flower cluster) and Perfect Sentiments.  I did some omitting stamping to stamp the "Happy" and "Birthday" on different lines.  If you look at this stamp set the words are in a straight line, but I wanted them to fit on my tag, so I inked each word separately.
 I embossed the background with the Happy Birthday Cuttlebug folder and used washi tape to make a banner.  I colored the flower image with Copics to match the washi colors.  I then mounted everything on a pink card base.

Thanks for stopping by and please be sure to check out the other DT designs and visit the Inspired Stamps blog for more tips on how to memorize scripture and make beautiful art journal pieces.  Have a great long weekend.  My kids are looking forward to sleeping in :)

Thursday, August 22, 2013

Inspired Stamps DT Thursday

Hello everyone!  Another week almost gone.  Where does it go?
This week the DT was asked to create projects using our favorite HLO and scripture.  I just love Girl Studying HLO, she is so adorable.  I decided to place a piece of multicolored dp behind the focal image.  I colored her shirt in an orange stripe (good Fall colors) and cut and embossed the image and the matte.  I decided on yellow for the matte, it made the image pop more than the orange did.  I love Kraft card bases and I stamped the scripture right on the base.  I chose Proverbs 16:3 from His Plans For You set.  Since school is back in full swing, this seems to be a scripture I am reminding my children of often.  It is so hard to get back in the swing of school when the weather is so nice.
I hope you enjoy another CAS card from me.  Please remember to check out the other DT member blogs or the Inspired Stamps Blog to see more beautiful creations.  Also make sure to visit the Inspired Stamps blog on Friday for another installment of "How to Memorize Scripture".  Fun techniques to put scripture to memory and of course some beautiful art techniques as well.

Thursday, August 15, 2013

Inspired Stamp Thursday DT post

Hello Everyone it is Thursday and we have a DT post using scripture of our choice.  Today I chose Proverbs 4:23 from the Guard Your Heart set.  I love this set with great scripture as well as images.  

I chose clean and simple.   I used two pieces of Washi tape (black with polka dots) for background.  I embossed circle hearts on red square, added a piece of black stitched ribbon.  I cut a circle with Spellbinder die and embossed it.  I stamped my scripture and I felt it needed something else so I added the 3 punched hearts to go with the verse.  Last, I rounded two of the corners on the card base and voila, done.

I hope you like it, please leave me some kind words and let me know what you do to guard your heart.
Please be sure to check out the Inspired Stamps blog for all the other great DT designs and then on Fridays Antoinette is starting a new series so be sure to stop by and check it out.
Have a blessed day.

Thursday, August 8, 2013

Inspired Stamps Thursday DT -one stamp 3 ways

One stamp 3 ways
 Hello everyone, it is Thursday and what a busy week with school starting back for the kiddos.  With all the hustle and bustle I feel my card making skills are on hold.  This week we were to use one individual 2X2 scripture  ( I chose Romans8:28, we all need reminding of this scripture from time to time, don't we?) and make 3 different cards.  I chose to stay in the same color palette but chose different background papers and edgings.  I chose to add a bit of bling or pearls to each card.  The second card has a bit of Tim Holtz paper string tied in a knot at the top.  I used different dies to cut out the scripture and mounted each on foam tape.  Pretty simple but I feel these are also masculine enough to send to some of those men in our lives who bless us.  I am always in need of a masculine card.  Hope you have a great day, please pray for my family as we are embarking on many new journeys this school year.  Please feel free to check out the other talented DT creations by clicking directly on their links to the right or visit the Inspired Stamps blog.