Thursday, October 30, 2014

Inspired Stamps DT Thursday


Hello Everyone, It is Thursday and the Inspired Stamps DT is back with some new projects.  Today we were asked to make anything that included scripture.  My brain is still on Christmas projects since we are less than two months away.  I haven't placed stamped images on candles lately so I thought I would try with tea lights.  I used Inspired Stamps: Spring Sketches and Ephesians 5:20 individual scripture to decorate the tea lights and the the box.  


I cut out several circles of tissue paper with my Spellbinder circle dies.   I found it worked best if you cut several layers at a time with a piece of paper or cardstock on top.  This helps everything to cut nice and neat and release from the die.  I used the carstock piece as a template to find center to punch hole in tissue paper for the wick to come through.  I stamped on the tissue paper with Versafine ink and then turned each piece over to color with Copics (on the backside) and then punched the center hole using the cardstock template.  I then applied heat with my heat tool and melted the tissue paper to the top of the tea light.  I made the box and decorated with more Spring Sketches stamps and then added the scripture.  Voila, you are ready to give a small gift to a sweet friend.  You could leave the outside silver cup showing or wrap in decorative paper or do as I did and wrap with Washi tape.
I hope you enjoyed my project.  Make sure to check Inspired Stamps Blog for the rest of the DT projects and the continuation of the 12 weeks of Christmas posts each Friday for more inspiration.  Have a great day.


Friday, October 24, 2014

Inspired Stamps- 12 weeks of Christmas

Hello everyone,
Christmas is right around the corner and many of us are still looking for Christmas card and project ideas.  Well at the Inspired Stamps blog you will find a new idea each week, this week it is my turn to share a project tutorial.  Today I created a "card in a box" using the Shepherd boy and the standing sheep stamp and laying sheep stamp.  I stamped the sheep several times on cardstock and watercolored the images using distress markers.  There are several different versions of this "card in a box" on the internet, but I like this one the best because you can get two out of one 8.5 X 11 inch piece of cardstock.  You cut the 11 inch side in half, to get two pieces of 8.5 X 5.5 inches.

 Place 8.5 inch side on top fence of scoring tool and score at 2, 4. 6 and 8 inches.  Turn 90 degrees and score at 2 3/8 inches.  Now you will need two tabs for inside of box and these can come from your scrap pile (we all have one of those don't we?)  These are 3 X 1/2 inches, score each end of the 3 inch length at 1/2.  (It is easier to score at .5 inches and then flip around strip and score again at .5 inches).  Then you will fold one part toward the back and one part toward the front.  This is a Z-fold.  Apply sticky strip (strong adhesive) to the outside edges of scored piece to attach inside box.
 The box panel is folded and burnished on three sides.  (You want to keep fourth side upright, this will be your back panel, this is also where the sides are attached with strong adhesive. Cut up three of the score lines to create flaps (this is the shorter of the panels).
 The Z-fold strips are placed on the inside of the box.  It is easiest to use a strip with fold facing back panel and line up with the back edge, adhere, then line up side and fold box on side and burnish.  Repeat with strip toward the front of the box.  These pieces are needed for the box to have stability and to allow you to attach your embellishments.  I added pieces of BoBunny paper from the Christmas Collage collection.  The pieces were cut to 2 X 2.25 inches, adhere to 3 side panels, the back panel was a bit longer.
 I cut 1/4 inch strips to attach to back of my Shepherd and sheep to better attach them to the inside strips.  I also added some grass to these strips, since sheep are grazers and it helped mask the white strips.  I added Luke 2:11 to front flap and stars to back panel.
 More BoBunny Christmas Collage paper was added to bottom panels.
 The back of the box is where you can stamp your sentiment and write your personal message.  My sentiment came from the Christmas verses set.
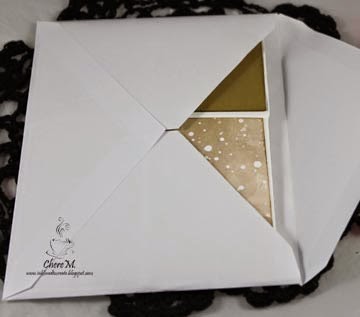
 Here is the box folded flat.  When you are adding your embellishements you want to make sure they will not stick out the sides when folded flat, so that the card will still fit in a standard A2 envelope.  The card mails flat, but what a wonderful surprise for your recipient when the open up and see your creation.  I just love how fun these cards are to make and how happy they make the recipient.  I hope you enjoyed the tutorial and I hope you will give this card a try.  If you have any questions, please let me know.  Thank you so much for stopping by today and please be sure to check in often at the Inspired Stamps blog for more inspiration.

Thursday, October 23, 2014

Inspired Stamps DT Thursday

 Hello everyone.  Today the Inspired Stamps DT was asked to make" anything but a card with scripture".
I have wanted to make a coaster home decor item for a while and decided to make something for the Christmas season to go along with our 12 weeks of Christmas.  Tomorrow I am the guest designer for the 12 weeks of Christmas post and I will have a special card project with instructions, so please be sure to check back.

Today I used 3 different shaped coasters.  I look for these when they go on clearance since I know I will be covering them with my own designs, I don't worry about what is on them.
I used several Inspired Stamps sets for this project: 1.5 inch circle Christmas, Ask, Seek and Knock, Isaiah 9:6, Perfect Christmas Sentiments,Christmas verses and Typewriter text lowercase.
I covered the coasters with Christmas papers and stamped images and colored with Copic markers.   I added embellishments such as, white enamel paint for snow on tree, colored pearls, punched corregated stars, rosette snowflake, etc...


I hope you are inspired to make a home decor item that tells your visitors the true meaning of Christmas;  the gift of Jesus.
Have a great day and be sure to check with the Inspired Stamps Online store for all of these sets and the Inspired Stamps blog for all the wonderful creations by our DT and to follow the 12 weeks of Christmas posts.  Remember I will be back tomorrow with a special project for the 12 weeks of Christmas.  Thanks for stopping by.

Thursday, October 16, 2014

Inspired Stamps- DT Thursday

Today the Inspired Stamps design team is bringing you "Fall Birthday" cards.  I made my card with Perfect Sentiments and Fall Gratitude, Inspired Stamp sets.  The designer papers are from the BoBunny Apple Cider Collection.
I inked all the paper edges with walnut stain distress ink.  I cut a flower from a couple of Spellbinder flower die sets.  I cut a few small tags and stamped images from Fall Gratitude and then inked with antique linen and walnut stain distress inks.
Remember every Friday is a new project posted on the Inspired Stamps Blog for the 12 weeks of Christmas, don't miss some great ideas.
Hope you have a great day.  Thanks for stopping by.

Thursday, October 9, 2014

Inspired Stamps- DT Thursday


 Fall is in the air.  Most schools are taking Fall breaks, so at Inspired Stamps we are making Fall cards.  Today I used the Flower Value Pack set for the sunflowers and stems and Perfect Sentiments for all the sentiments.
I used BoBunny Apple Cider Collection and Neutral double dot papers.  Both of these paper packs and many others are now available for purchase in the Inspired Stamps Online Store.
I colored and fussy cut all the sunflowers and stems.I added glossy accents and glitter to the center of each flower.  I love the extra sparkle each flower provides to the card, but the glitter will not flake off because it is embedded in the glossy accents.   I used dies for the label and the flower pot and the Fiskars grass border punch for the grass around the pot.  I also used a Sizzix die to create the pop up element.

I thought it would be fun to open to a bouquet of flowers.
Please check out the other DT creations by visiting their websites and check out what is new for this weeks post as well as to follow the 12 weeks of Christmas posts over at the Inspired Stamps Blog.
Have a great day and be safe.

Wednesday, October 1, 2014

Inspired Stamps- October Release


Hello, It is time for the Inspired Stamps October release.  More Hymn Girl stamps to enjoy and love and a precious donkey, ready to be added to the Nativity scene.  You will want to check out all the DT blogs today as well as the Inspired Stamps blog to see all the lovely creations with these new sets.
Today I have used the Hymn Girl:  Girl with Sign stamp paired with the sentiment from His Word.  I have colored my girl in fall colors and paired her with the new to the Inspired Stamps Store, the BoBunny Apple Cider Collection of 6 X 6 patterned papers.  I added a rust colored solid cardstock punched with border punch.  I also added a few punched leaves.

Remember Friday Inspired Stamps starts the 12 weeks of Christmas series.  Make sure to stop by the Inspired Stamps Blog to get inspired for your Christmas projects.
Have a great day and as always these new stamps and the BoBunny paper pads will be available in the Inspired Stamps Online Store.