Showing posts with label Distress inks. Show all posts

Thursday, March 10, 2016

Inspired Stamps- Thursday DT post

 Today the Inspired Stamps DT are creating Spring/Easter themed projects.  Easter is just a few weeks away, so this is a good time to start thinking of making your Easter cards if you haven't done so already.  If you are needing a bit of inspiration, today's post may be helpful.  I used the Inspired Stamps set: His Cross for my card.  I used the cross focal image and two of the sentiments.  This set also has two scripture verses, so it is a nice, versatile set.  Water coloring is very popular currrently, so I masked off the cross and water colored the background with various Distress Inks, I then cut out the image using a Tim Holtz die and water colored the image with more distress ink.  I added a bit of grass and a few flowers.  The sentiment on the front was die cut with a piece of the remaining background.  I diecut another layer in black and embossed to add a bit of texture.  I embossed the white layer and added to a black card base.

For the inside:  I stamped same
focal image in a gray ink and then the second sentiment.
I hope you enjoyed my card.  Please leave a comment.  If you are interested in any of the these or other Inspired Stamps, please visit the Etsy shop by clicking on the Shopping Anyone? link.  To see other projects, please visit the Inspired Stamps Blog or the other DT blogs by clicking on the links provided.  Have a great weekend.

Thursday, February 11, 2016

Inspired Stamps Thursday DT

Hello Everyone, Welcome back to the Inspired Stamps Thursday DT post.  Today we are bringing you some love themed projects.  
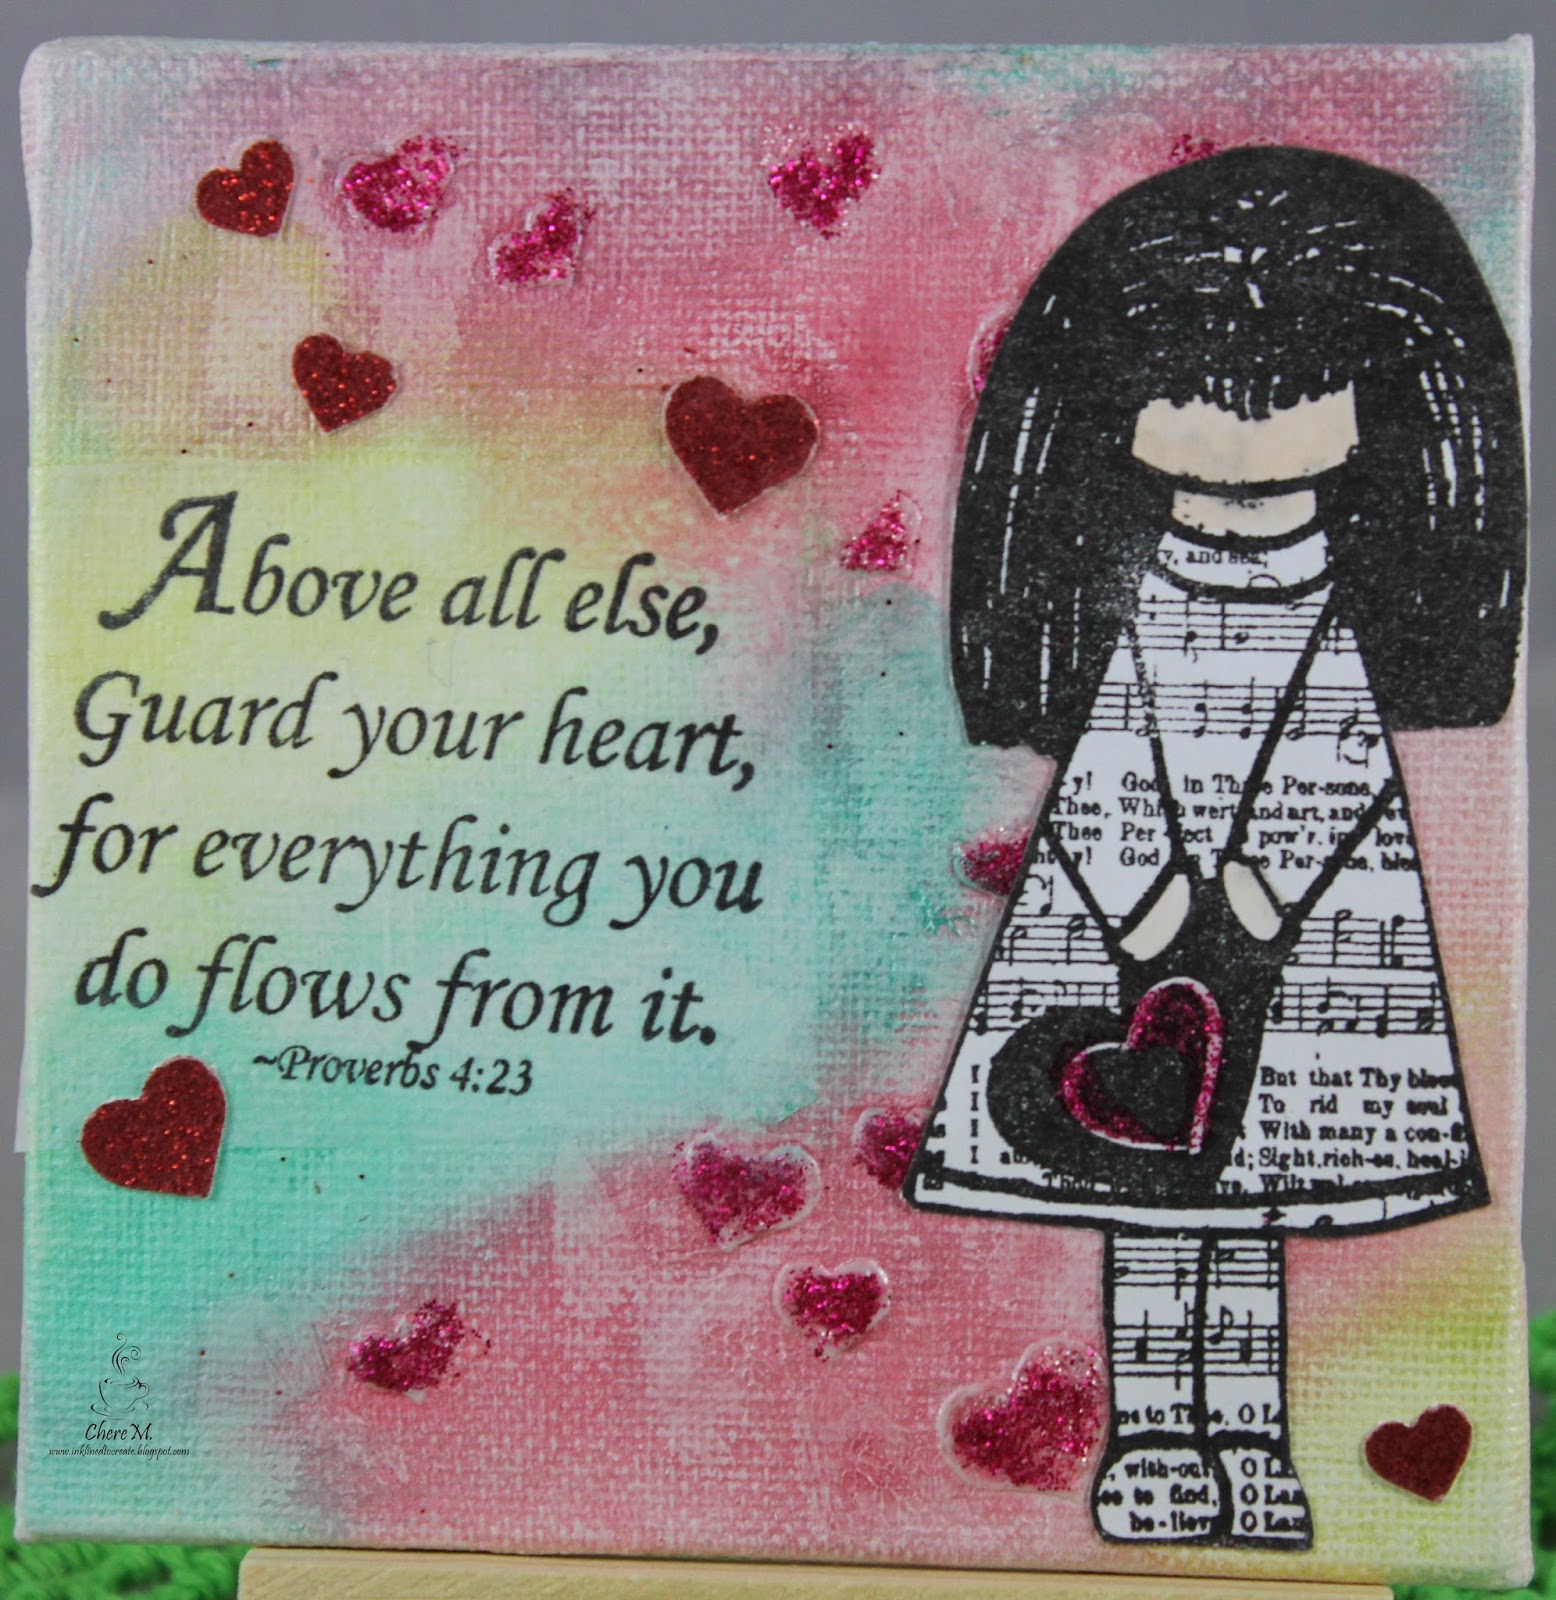
My first project is a flat canvas board that I made a small piece of art for my desk.  This verse is always a good reminder to us all, as followers of Christ "to guard our hearts"  so we can be a "light" to those around us.  I have been playing with mixed media a bit lately, but I find I still "play it safe" with a clean and simple design.  I have watched tutorials of how artists layer many things on their backgrounds, before adding the focal images.  These always turn out stunning but it will take more practice on my part to feel comfortable with it all.  I started by applying Gesso to canvas, then some modeling paste through a heart stencil.  I allowed all to dry and then added some metallic Gelatos.  I allowed this to dry and added the focal images: scripture is from Guard your Heart set and girl is Hymn girl January and then some punched glitter hearts.  I like how it turned out and can't wait to play again with more.

In case my mixed media canvas was not "love themed" enough I made an easel card.  For the card I used BoBunny paper in the Madeline collection, Hymn Girl February, Typewriter Text  Uppercase Alphabet by Inspired Stamps.  The love is a diecut using a die from My Yellow Bicycle to cut glitter craft foam.  I used distress inks on the edges and a bit of Tim Holtz lace and voila.  Please be sure to visit the Inspired Stamps blog for more inspiration. We have a very talented DT and you can click on the buttons that will lead to their blogs on the right.  Also if you are interested in purchasing any of the stamps I used or want to see more please click on the button under "shopping anyone?" and it will take you to the Etsy store where you can purchase these and many others and bonus, if you live in the US you can get free shipping.  I love free shipping!
I hope you take the time to tell those around you that you love them not just on Valentine's Day but everyday.
Have a blessed day.  Share your love.

Thursday, April 23, 2015

Inspired Stamps DT Thursday

Hello Everyone, I hope you are having a great week and getting a bit crafty in the midst of all your other responsibilities.  I know some weeks are hard for me to find time to create something.  This week was one of those weeks.  My oldest daughter came home from her first year away at college yesterday and I had to prepare her a place.
The window in front of my craft desk cracked and I had to move all my stuff into another space, since she was away at school, I chose her room.  They came and repaired the window and found another crack, so I have to wait for them to come back a second time, so I do not want to move all my crafty goodness just to have to move it again so I kept it in her room, well now she is home and window is not yet replaced.  Ughhh!!! What to do with all the stuff.  So yesterday I had to do some clever rearranging so she would have a place for her stuff, which seemed to multiply while she was away.  Isn't it funny how our stuff, especially our crafty stuff does that?  Anyhow onto my project for this week.
This week was DT choice and I have been waiting to do something with this paper mache cross I found at Hobby Lobby 80% off at Christmas.  I paid 0.20 cents.  I thought to myself, "for 0.20 cents I surely will find a use".  I found this great stone paper from one of my BoBunny paper packs, I think it was Enchanted Garden.  I decoupaged the paper to the cross and added this verse, which is a great reminder of the safety we have in the Lord, even when everything around seems to be out of control.  The stone reminded me of a tower, I also wanted some greenery to symbolize the "new life" we have in Jesus.  I made a rolled rose and colored some white paper twine with Distress Inks and now I have a beautiful reminder of the safety I have in Christ.  I tried to make the leaves look like a vine that would wrap its' way around the tower.
Have a great week and remember the Lord is our strong tower.
Check out the Inspired Stamps blog for more inspiration and the Etsy shop for more stamps like this 2 X 2 individual scripture Prov 18:10.

Thursday, March 19, 2015

Inspired Stamps DT Thursday

 Hello, Happy Thursday.  It is Spring break here in my neck of the woods.  It has been a nice restful week.  I have had lots of time to be creative.  I have seen these screen cards and I wanted to try it.  I thought for today's theme of scripture this would be a great card.
This would be so encouraging for the recipient to display on their desk and remind them of how God uses their trials to produce endurance and that He uses all things for our good.  I know this is a great encouragement to me.  I embossed the panels and added some die cut leaves, that I water colored and then added Ranger rock candy.  It leaves a nice cracked finish.  I added punched flowers with pearl centers and some vellum butterflies with pearl middles.  This card would fold up and fit into a standard size envelope.
This is definitely one I will be creating again.  The scripture stamps are 2 X 2 individual scripture stamps from Inspired Stamps which can be purchased at the Etsy store.
Remember to check out the other DT projects and leaves some words of kindness.  We love to hear from you.  Remember the 31 days of March bible journaling is still taking place.  Visit the Inspired Stamps blog for the link to learn more about journaling in your bible.
Have a great week and create something and encourage someone.  Thanks for stopping by.


Wednesday, January 21, 2015

Inspired Stamps DT Thursday

 Hello and happy Thursday.  I have a new card using the Hymn Girl: Sitting Here Thinking stamp.  I colored the image with Copic markers.  I fussy cut it out and then used foam tape to add to a die cut oval that I used distress inks to create a sky background.  I used a piece of brown cardstock embossed with woodgrain embossing folder, a piece of green Bazzill cardstock and a piece of the Madeline collection from BoBunny 6 X 6 paper pad.  The sentiment is from the Card Ministry Basic stamp set.

Please be sure to check out the Inspired Stamps blog for more card ideas using this Hymn Girl line of stamps and be sure to visit the new Etsy shop to purchase these sets and many others.  All US orders of 25.00 or more have free shipping with code 25freeshipping.

Thursday, October 16, 2014

Inspired Stamps- DT Thursday

Today the Inspired Stamps design team is bringing you "Fall Birthday" cards.  I made my card with Perfect Sentiments and Fall Gratitude, Inspired Stamp sets.  The designer papers are from the BoBunny Apple Cider Collection.
I inked all the paper edges with walnut stain distress ink.  I cut a flower from a couple of Spellbinder flower die sets.  I cut a few small tags and stamped images from Fall Gratitude and then inked with antique linen and walnut stain distress inks.
Remember every Friday is a new project posted on the Inspired Stamps Blog for the 12 weeks of Christmas, don't miss some great ideas.
Hope you have a great day.  Thanks for stopping by.

Friday, September 5, 2014

Friday Friends with Flair

 Hello Everyone!  Good to be back and creating with Unity.  I had to take a few weeks off with getting dd ready for college and settled in.  It has been so hot here that I find it just zaps my creativity, how about you?
Today I used Unity's Itty Bitty; Untamed Beauty.  I am in love with mason jars, so I stamped a mason jar from Inkadinkado's mason jar set and colored with distress inks.  I colored the image with Copic markers and pulled out my sewing machine to stitch at bottom of card near sentiment.  This has been on my chicken list for quite a while, but I finally cleared a space for my sewing machine and gave it a go. I really like it.  I added some ribbon and gems for a finishing touch and voila.  Enjoy!   Thank you for stopping by.

Friday, May 9, 2014

Friday Unity Friends With Flair

Hello everyone, another week passes with all of it's craziness.  Still I managed to make a few cards. I am also trying to work on the decorations for my DD graduation party (two weeks away and counting, please pray I can get done what I need to for this event).

I played some more with water colors for the focal image and then over stamped the background with this lovely image from the Unity set; Bold Insight.  I went in and water colored the flower heads with purples.  I embossed the script embossing folder onto purple cardstock and inked with Distress inks.
Added a few finishing touches like the ribbon, inking the edges and then popped up image.  Pretty clean and simple.
Thanks for stopping by and have a great weekend.

Friday, April 18, 2014

Unity Friends With Flair

Hello and Good Friday,
I wanted to share a quick Easter card using a few products I have had for a while but have not used.  One is the Darice cross with words embossing folder.  I cut out the cross and distressed with Distress inks: Peacock feathers, Concord, and Picked Raspberry.  I just wanted some nice "Easter colors".  I used a woodgrain embossing folder on Kraft for background and stamped sentiment from Unity's "What Matters Most" set.  I cut banner and inked with distress inks.  Just playing around and quick card was born.  It has been a busy week so not much more to share on the crafting front.
Have a Happy Easter and thanks for stopping by.

Thursday, April 10, 2014

Inspired Stamps DT Thursday

 Happy Thursday.  It is starting to feel like Spring.  Today I made a CAS card using Hymn Girl November.  I love how lovely this image is with her kneeling and praying.  I used Bazzill cardstock and dp Vintage Marketplace.  I thought it looked like wallpaper in a young girl's room.  I colored the girl with Copics but did not want solid green for her dress so I outlined and blended with Colorless blender pen, I just wanted some color to pull out the background, but not a lot.  I used American Craft adhesive glitter tape to join dp to cardstock and then attached to cardbase.  I used Spellbinder Romantic Rectangle dies.  The smallest die would not accomadate the word "Prayer" so I masked off the -er and inked only the word Pray and stamped on the rectangle and inked with Distress inks.

Remember to check out the beautiful projects by our other DT members and be sure to visit the Inspired Stamps blog at noon today to see if you are selected as a winner of the $10.00 gift certificate for commenting on the last two blogposts.  Thank you for stopping by.  Remember that these lovely stamps and many others can be purchased in the Inspired Stamps Online Store.

Thursday, March 20, 2014

Inspired Stamps DT Thursday

Happy Thursday.  Today at Inspired Stamps we are bringing you Easter cards or tags.  I chose to make two Easter cards.  I used the same stamp set; His Cross for each but chose different color Copic markers to color the image and different Distress inks for background technique.


 For this first card I chose to stamp the focal image on a 2 X 3 inch piece of white cardstock and color with black and purple Copic markers.  I then scored the image (front facing up) every .5 inches to make a faux tile look.  I then inked with Pumice stone and Dusty Concord Distress inks to make the "grout" lines pop.  I added some punched flowers and leaves and mounted on black.  I embossed white card with embossing folder and inked with Pumice stone and matted on black.  The inside of card I used 1 Peter 2:24 and embossed a few straight lines on side and bottom and added same flowers and leaves (but in purple).

For second card I used two different embossing folders and Pumice stone and Dusty Concord distress inks on both.  I cut out the embossed oval with leaves and used foam adhesive to mount to second embossed image and matted whole thing on black cardstock.  I colored the leaves with Distress markers and added punched flowers.

Thank you for stopping by today.  Please be sure to check out the other DT projects.  Don't forget to check out the Inspired Stamps blog for the 31 days of Art Journaling your bible study.  Antoinette has some beautiful art and tips to share with everyone.  This set as well as many others can be purchased in the Inspired Stamps online store.

Thursday, March 13, 2014

Inspired Stamps March Release DT Thursday

 It is time for the Inspired Stamps March release.  Inspired Stamps will have these new Hymn Girl sets available in the Inspired Stamps Online store on Friday at noon.
I used Hymn Girl January today, she come with 3 words:  Confession, humility and January.  I chose to add the word Humility to my card.  I kept the image fairly simple coloring in the skin, for the dress I used a very light gray and a midtone for highlights and then added dark red for spot color.  I did the same on the card I kept it black and white, inking the music paper and oval with Pumice Stone Distress ink.  I did some faux stitching  and added a black strip with a dark red strip to bring out the color in my girl.  I colored some small pearls with a black Copic marker and added them above and below the strip on alternate sides.  Just a clean and simple card, really giving this sweet image center stage.
For the music paper I copied a sheet from our Hymnal and inked it and did the faux stitching.
Thank you for stopping by today and be sure to check the other DT creations to see the other Hymn Girl images.  Inspired Stamps is running a special on these sweet images, there will be one for every month of the year.  In today's release only January-June are released but if you purchase 5, you will receive the 6th one free.  So be sure to add these sweet images to your collection.  Visit the Inspired Stamps blog for more images, special details and more installments on the 31 days of Art Journaling your bible verses.

Thursday, February 27, 2014

Inspired Stamps DT Thursday

 Hello Everyone.  Today the DT at Inspired Stamps were asked to make tags of all sizes.  I chose a manilla tag by Ranger and used distress inks.  I cut apart a manilla file folder to make tag and bird and used Distress inks on them as well. I used a sentiment from Sing for Joy set with some other die cuts (the leaf sprig, the rolled flower, leaves and tag) to finish off this tag.  I used Distress stains to color the lace for the top of tag and added a paper twine bow.
Thank you for stopping by and please check out the other DT creations and other great projects at the Inspired Stamps blog.

Tuesday, January 21, 2014

Music sheet Christmas cards

 I know it is past Christmas but this style can be used for all occasions, so I thought I would share.  I absolutely loved making this card.  I copied some music out of an old hymnal.  We love books in my house and have a hard time destroying them, so I could not bring myself to pull out the pages to use directly.  I cut the pages down to fit card front, some of the songs were shorter so the music was a bit smaller but then I just created a larger border at top of card.  I inked the music sheets with distress inks.  I then stamped different snowflakes from Snowflake kisses set, Unity.  I stamped the snowflakes with tumbled glass and broken china distress inks.  I added a border strip and stamped a sentiment from different stamps sets from various companies.  I used various circle punches to punch out circles from solid color and music sheet, then added bling in the middle.
I used the Fiskars snowflake border punch for bottom edge of card.  I added a border with solid paper and music sheet at bottom border of inside as well.  I had fun making these and they were easy to do in multiples.
A sheet of a love song could be used with heart stamps and Valentine sentiments could be used to make a lovely Valentine card.  If you and your significant other have a special song, you could use it as the background paper.
Another variation would be to use sheet music for Happy Birthday and birthday stamps for a great birthday card.  I hope this helps get your creative juices flowing to make a card for the music enthusiast in your life.  Have a great day.  I will be back Thursday with an Inspired Stamps post and Friday with a Unity Friends with Flair post.  Thanks for stopping by and please stop by again soon.

Tuesday, January 14, 2014

Versatile Treat box

 Here is a versatile treat box that I made for Christmas treats for my DH co-workers.  This fun box is made from one piece of 8.5 X 11 piece of cardstock, only scored and folded.  NO CUTS!  How great is that?
I decorated the front of my box with the Sizzix Alteration line snowman cut and inked with distress inks.  I used the McGill Alpine snowflake and some Stickles and a SU label punch with sentiment.  Add a button and some baker's twine for a closure and voila.
 Score your 11 inch side at 3/4, 4.5, 6.5 and 10 1/4 inches.  Score the 8.5 inch side at 2 and 6.5 inches.
Fold in all your score lines to get them broken in.  Then open sheet and fold in the 2 and 6.5 inch scores toward the middle and then bring large piece up toward the center while creating a triangle to make pocket.  See picture below, do this for both the larger sides.  This creates the center pocket.  You have a choice to glue the triangles to the box side or leave them free (as you see in the photo).  Most of the time I would glue the triangles to the box front and back to make the box more rigid, but the box is fully functional either way.
As you can see from the photo it fit a good amount of "chocolatey goodness" in each box.
This would be a great box for any occasion and with Valentine's Day coming up, another chocolate holiday, this would be a quick and easy way to share with friends and family.
Thank you  for stopping by and if you want to check out the post where I first found the box head on over to Stamp With Silvey's blog.

Thursday, January 9, 2014

Inspired Stamps January Release

I hope everyone had a Merry Christmas and a Happy New Year.  I took some time off to be with my family, clean and rearrange my craft space (still a work in progress).  I am sure many of you ladies can relate.
Today Inspired Stamps is releasing some new stamps and our talented DT will be showcasing these new stamps in their projects so please be sure to check out all the DT blogs, I am sure you will love them all.  The stamps will be available in the Inspired Stamps online store Friday at noon.
I am using the new 2 X 2 individual scripture Isaiah 26:4.  I used my dd favorite color scheme of red, black and white.  I received some new Spellbinder dies (Crosses Two and A2 Fancy Postage Edge)  for Christmas.  I embossed the background with a fleur de lisa  Cuttlebug embossing folder and inked with pumice stone, fired brick and black soot distress inks for more depth.  I used Co'ordinations paper so that I could get the two colors after a bit of sanding.  I hope you visit the other DT  and see their creations and don't forget to stop by the Inspired Stamps blog for more posts and possibly a few surprises.

Friday, November 8, 2013

Happy 3rd Birthday Inspired Stamps-faux letterpress tutorial

Hello everyone.  Did you see the Inspired Stamps new releases yesterday?  How about Deneen's tutorial on embossing with Spellbinder dies on Wednesday?  Well, I have seen that technique on many cards and loved the look but was not sure how to achieve it, until now.  Deneen had showed how to emboss with a Cuttlebug and I have a Big Shot so I tried the the technique with my machine.
 Open the multipurpose platform to Tab 1 and add cutting plate, cardstock, die, embossing matte, embossing plate. Proper Sizzix Sandwich: Later I tried again and altered the sandwich from what you see in the picture:  Tab 1, cutting plate, die, cardstock, embossing matte, embossing plate.  This will work much better.  Voila.  I will be trying this out in the future.  Thanks Deneen for the tutorial.
 I decided to stay with the embossing, but show how to do a faux letterpress.  I love to use my embossing folders to create background designs, but we can take this a step farther by inking the embossing folder on the flat side with a water based ink (tumbled glass Distress ink used here).

 Ink the flat side of folder (without raised image) by swiping with the ink pad to cover completely.
 Add cardstock and close folder and run through machine. Sandwich: Tab 1, cutting plate, embossing folder containing cardstock, second cutting plate.
 Here is the finished design.  The flat parts of paper are now colored in tumbled glass and the snowflakes are embossed and still white (original color of cardstock).
Clean up is quick with a baby wipe or the embossing folder can be washed in the sink with warm soapy water.  The water based inks wash completely off folder, no staining.  I am not sure how pigment inks or chalk inks would work in this technique, if anyone has tried other types of ink please leave a comment and let us know how it worked out.
 I used a music embossing folder and antique linen Distress inks.  This time I wanted to stain the embossed image as well, so I used walnut stain Distress ink and the sponge applicator.  I applied ink by starting off image and moving the applicator in a circular motion.


 I wanted a really distressed image, so I crumpled the paper in a ball and then smoothed out again. My son said, "Mom, why did you turn that paper into a wadded up tissue?"
I admit at this point it does look a little rough, but I love the final results.
 I used the new release Winter Sketches and added a satin ribbon.  I colored the images with Copic markers.  I had colored four of the holly leave images and was playing around with placement when I noticed  a "flower" emerging when I placed them together.  I added red Stickles and had the Cardinal sit in the cluster.


I matted the snowflake background on a white piece then a black piece.  I tied a ribbon around and then finally adhered it to the card base.  I used the sentiment and the images from Winter Sketches.  I hope you try this technique to make some interesting backgrounds for your cards.  Remember that the new releases are available later this afternoon in the Inspired Stamps online store and there is a nice coupon to celebrate Inspired Stamps 3rd Birthday.  Please be sure to check out the Inspired Stamps blog for more tutorials.  Have a great day.
Thursday, June 27, 2013

Inspired Stamps- Thursday DT

Today at Inspired Stamps we were supposed to create cards that reflect our style.  I don't know if I have one style.  I like cards that are clean and simple.   I like trying techniques, like inking, coloring, folds and paper piecing.
For this card I used glossy cardstock to stamp the Amazing Grace background in Versamark ink.  I allowed it to dry completely and then inked with peeled paint and faded jeans Distress inks and buffed with a clean cloth, then I went over image with black soot and buffed image again.  I stamped the image from Be Still Silhouettes   The image was cut with Spellbinder squares and the matte was Spellbinder lacey squares.  I cut the card with the square die and voila a lovey square card.  I love the ghosting of the words behind the image.
Thank you for stopping by today, please check out the other beautiful creations at the DT blogs and by checking out the Inspired Stamps blog.

Thursday, May 9, 2013

Inspired Stamps May Release

Hello Everyone!  Today is a new release at Inspired Stamps.  I used new scripture Jeremiah 1:12 with images from His Word set.  I used an embossing folder (Spellbinders) and inked with distress ink.  I colored each image with Copic markers and added the black stitched ribbon at top.  I used pop dots to pop up scripture on the card.  I am encouraged by the scripture and I hope you are too.  Please check out the Inspired Stamps online store for all the new scripture and image releases at noon tomorrow and check out the Inspired Stamps blog for more projects made with the new releases and more inspiration.  Thank you for stopping by and have a great Mother's Day weekend.

Thursday, April 4, 2013

Inspired Stamps April Release-Thursday DT post

Hello Everyone it is time for new releases at Inspired Stamps.  Each of the DT members has made projects using new sets that will be available in the Inspired Stamps Online store tomorrow at noon.  The new release set that I used for both of my projects is called Labelmaker verses. This set has verses as you see on my home decor house.  I cut apart Phil 4:13 to fit on my card.  I used individual word stamps for words on the roof and grass area.  

 I used a chipboard house to make my home decor project.  I inked with distress stains and then stamped words and verse and cut out each piece.  I inked the verse with distress inks.  I punched a grass border, bird and used Sizzix distress floral die to make the flowers.  I really like the way this turned out.  The word is relief and the background is what takes the ink, so when I stamped on white paper, the word stays white.  So you can easily change the look, with your ink and paper choices.  Awesome.

For the card, I was inspired by the Labelmaker verse to make the background out of paint chips.  I cut off the paint number and name and had a 1/4 inch strip to use on the card.  Notice how I reversed the order of the strip for repeated strips ( I started with darkest color to lightest, then lightest to darkest).  I cut apart the label verse to fit on the strips and added a clear acetate flower with a button as a pop of color. I didn't want to take away from the colorful background, so the clear flower (with polka dots) worked the best.  
Please make sure to check out the Inspired Stamps blog for the other ideas and new releases and then make sure to go to the Inspired Stamps Online store tomorrow at noon to buy these new sets.  Inspired Stamps are made in the USA.