The ice cream sundae was adapted from a published Stampin' Up! suggestion. All except the sentiment was accomplished with punches. Even the polka dot background was created by punching the white cardstock with a handheld hole punch and placing it on a larger red matte. This was a bit time consuming making all the individual parts of the sundae and gluing them together, but in the end I think it turned out to be a very cute card and worth the effort.
Paper: white, green, red, pink, brown, yellow, and light brown cardstock, The Paper Company; dp for bowl (scrap, source unknown)
Stamps: You're Sweet, Studio G
Ink: Basic black, Stampin' Up!
Tools: lace border punch, Martha Stewart; small oval, McGill; 1/2" and 1" circle punches, Stampin' Up!, EK Success; decorative edge scissors (toppings), Provo Craft
Punched flower trio, friendship card # 10
Paper: ivory card blank, JoAnn Craft Essentials; red, pink, and green cardstock, The Paper Company
Stamps: sentiment (Friends are flowers in the garden of life), The Paper Company Studio
Ink: basic black, Stampin Up!
Tools: leaf, anywhere paddle punch Sizzix; large flower, EK Success; small center flower, flower trio punch, Stampin' Up!; border scallop punch, EK Success, stems hand cut; background was embossed with distressed lines folder, Cuttlebug
Embellishments: brads, Spare Parts
Technique: flowers were crumpled and smoothed to create interest; background was inked with distress ink, direct to paper
Thanks for looking. Have a blessed day!
Friday, February 26, 2010
Thursday, February 25, 2010
Autumn Brook
This is a stamp called Autumn Brook by Stampscapes. I followed some tutorials from http://www.stampscapes.com/ to create and color this scene.
Paper: blue card blank, DCWV; green and black cardstock, The Paper Company; glossy paper, Kodak photo paper.
Stamps: Autumn Brook, large reeds, Stampscapes; tree branch, Winter woods, Rubberstampede
Inks: Autumn rainbow ink pad, Memories; Autumn leaves rainbow ink pad, Kaleidacolor
Tools: sponge eye shadow applicator to color image
Embellishments: olive green ribbon, ribbon, JoAnn Crafts Essentials double sided bobbin ribbon (opposite side has white polka dots)
Technique: Stamped image on glossy paper and use eye shadow applicator to apply ink, starting with the lightest color first and building the color to add depth. I followed the video tutorial on link given above.
I am really pleased with the way the card turned out and how stamping the reeds and branches changes the depth of focus on the card and gives it more interest. I am still very much a novice at this technique but I will be practicing with it some more. Thanks for looking.
Get Organized Wednesday (on Thursday)
Here are a few more drawers of my 10 drawer file cabinet that stores my supplies. I have two drawers that store my Sizzix dies (you can see large and medium dies in this drawer). I can stack the large dies 3 high. Before this system, I had them all in very high stacks on my shelf and I would have to take them all down to find the one I need. Now I store like dies in a stack and only have to look through 3 to find what I need.
The other drawer holds my punches. This makes it very easy to find the punch I need, use it, and put it back. I have two drawers of punches. I hope this starts to get your organizational muscles flexing to see how you can use something you may already own in a new way to organize your supplies.
Saturday, February 20, 2010
Owl Be Praying for You
I wanted to try out a new technique for making clouds in the blue sky. I liked how it turned out so I needed to find a way to use it on a card. I found this cute owl on a branch, and I had just received the sentiment and voila! It all came together.
Paper: white cardstock, The Paper Company; light blue and turquoise cardstock, DCWV
Ink: Chocolate chip, SU; Buckaroo Blue, SU; Sahara sand, VersaMagic Dew drop, Tsukineko, chocolate brown and green marker
Stamps: Owl from Whimsical Birds, TPC Studio; sentiment, Clear Dollar Stamps
Tools: scalloped oval punch, oval nestabilities
Embellishments: chocolate brown with blue dots, Target dollar section
Techniques: I used a scalloped oval as mask, starting at bottom and sponged on Buckaroo blue, SU, moving the oval across the page and at different angles and then moving my way up until all area was covered with clouds. This was super easy and I love the way it turned out.
Another hint: I have been trouble cutting my nestablilities with my Sizzix original machine, I needed a spacer in addition to the system converter. I tried everything I could think of. I finally could get good cuts with an old CD as the spacer, but this would not allow me to cut the largest of the nestabilities. So as you can imagine I was still frustrated. My dh came up with using the cover of a CD case. I scored all the edges and broke off the ridges. BE CAREFUL, this makes for some sharp edges. After I created a flat piece, I covered it all in clear packing tape to cover the edges and give it more stability, but let me tell you it works great.
My second problem was embossing with the nestablilities, they would always shift on me and I would emboss the wrong area, so I added a thin magnet sheet (you know the kind that come home with the calendar from your childs' school), now it keeps the die from shifting and I get good, crisp embossed edges. Yea!!!! I hope this helps someone else out there that wondered if they could use their original Sizzix with the Spellbinder dies and how to get it to work well. Let me know what you think. Thank you.
Friday, February 19, 2010
River Scene Candle
I wanted to share with you a candle I made for a friend with the River Scene, Clear Dollar Stamps. I added the same verse I did to the card. It was a little difficult watercoloring on tissue paper, the tissue paper was very delicate when wet. It did make for a muted scene, which I did like. But next time I will try to color with another method.
I have never decorated a candle with a line image stamp before, so this was a first.
Sweet Baby Girl
I saw this card in one of the many magazines I love to "pour" over for ideas. I believe it was in, Cards. The cards are so beautiful in this publication, but the price is a bit steep, so I cannot afford to buy an issue too often. I must say, if you have not seen an issue of this publication, pick it up and look through it and you will fall in love.
This card was not too difficult, but be careful about the way your card opens and score the correct side of the baby bottle. I had to re-do this part because I was not paying attention.
Paper: white and light pink cardstock, The Paper Company; dp yellow with subtle stripes (this was a piece of scrap and I do not remember the source)
Stamps: Sweet Baby sentiment, Inkadinkado
Ink: Pixie Dust Dew Drop, Tsukineko; Vintage Photo, Distress Ink
Tools: paper crimper, Fiskars; corner rounder, EK Success; Crafters Companion
Technique: scored lines up side of baby bottle, rounded the corners of yellow paper to create the nipple of bottle, direct to paper inking of light pink strip.
Embellishements: pink hand prints ribbon, Ribbon Trends mini spool (Hobby Lobby)
This was a very cute and simple, yet unique baby card. I hope you enjoy. Let me know what you think. I will get back to posting the retreat cards soon.
Wednesday, February 17, 2010
Get Organized Wednesday- Card File Cabnet
I don't know about you, but I love to read how someone else organizes their supplies. So today I want to share with you my wonderful find for storing many of my cardmaking and scrapbooking supplies. We live in a University town and our local university has a surplus store where people from the town can walk in and buy items the university is getting rid of for one reason or another. When my dh saw this index (library)card cabinet, he thought it would be great for storing photos. Let me tell you I have mounds of them and thought this would be great, I could organize them and be able to find specific categories to scrap on a moments notices. So my wheels start turning. I did not see a price so I inquired and did not like the price I heard and one of the drawers is a mismatch, so I told my husband of the news, but also let him know that I REALLY wanted it and thought it would be very useful. He inquired about the price, this time pointing out the mismatched drawer and the price went down by $40.00. Now it was in a range that I was willing to pay. I told my husband I really wanted it, but we assesed it would not fit in our vehicle that day, but payed for it to pick it up another day.
When we got it home and into my craft space (which took some doing, it is very heavy) I found that it did not fit photos. They were too tall for each drawer, but my wheels started turning again and I looked at my every growing supplies and started sorting. The cabinet has 10 drawers which are quite deep and each drawer holds a large amount of supplies. The two drawers I am sharing with you today are the top two drawers. My 8 1/2 X 11 cardstock drawer, which can hold up to 22 packages of 50 sheet cardstock. Wow!! That is a lot of cardstock.
The second drawer holds many, many, pre-folded A2 cards, as well as, some smaller cards in the back of drawer. This makes it convienient when I am making a card to choose a card base quickly to go with the rest of the elements of my card.
I love this cabinet and it is full of supplies that used to be in boxes stacked on top of each other, to right at my fingertips. I will share more next week.
Leave me a comment, if you have any questions or want to share your favorite organizational piece.
Tuesday, February 16, 2010
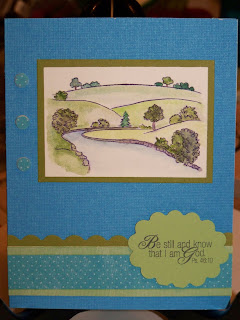
Be Still and Know, I am God
Today hubby and children are out of school, but mommy had to go into work, but dh drove me in. Lots of snow, lots of icicles hanging on our house, but we are warm inside.
I have been reading on other sites (hope to add my favorite websites to my site soon) anyhow, I would like to add a feature on Wednesdays showing you some unique ways I have found to organize my supplies. My craft space is in our shared office space, so I am limited in storage options, but I will show you what I have found over the years to store my supplies.
I love this image River Scene, from Clear Dollar Stamps. This was part of my birthday haul from my dh.
I was crafting with a friend of mine and she had never used the watercolor crayons before, so I taught her what to do and she colored this image and I turned it into a card.
Blue textured card base, DCWV
Paper: olive green cardstock, The Paper Company; dp Holiday Collection, DCWV (see how the blues match perfectly)
Stamps: River scene, sentiment (Pretty Little Scriptures), Clear Dollar Stamps
Ink: basic black, SU
Tools: scallop oval punch, Fiskars; scalloped border punch, Fiskars, 1/4 inch circle punch
Techniques: for round embellishements, I punched 1/4 inch circles out of dp and placed them on round pop dots (to act as brads, near image)
Monday, February 15, 2010
Yummy! Yummy! Chocolate Covered Strawberries
My youngest daughter wanted to share something special with one of her teachers and when we saw these huge strawberries I knew what it would be, we would cover them in chocolate. So that is what we did. I thought it was appropriate for snack for the family on Valentine's Day and we saved one for her and her teacher, too bad today was a snow day.
I thought I would share how big and lovely these strawberries were and let me tell you quite delicious. The whole family enjoyed this lovely treat.
Our Children's Play Area
A very lonely scene of our children's play area. I am sure glad that my husband and I spent a whole weekend sealing the wood because it is taking a beating this winter. I love to see how the snow covers over the dirt and yuck and makes everything look bright and new. It makes me think of "being made white as snow."
SNOW, SNOW, and More SNOW!
I thought I would share a card that depicts all the snow we are receiving outside. We are all home experiencing another snow day. This time I get to stay home with my crew because my place of employment closed due to inclimant weather.
White card base
Paper: buckaroo blue, whisper white, SU
Stamps: Nature's Secret, SU; sentiment, Warmest Regards, SU
Ink: Buckaroo blue, SU
Tools: snowflake punch, Martha Stewart
Embellishments: paper clip, white grosgrain ribbon, SU, white brad
Techniques: I stamped the image onto tissue paper glued to white cardstock to give it a linen look, I fussy cut the snowflake and added it to the center image with a brad.
Enjoy your day and stay warm. Be reassured that the Lord provides for our every need.
Sunday, February 14, 2010
Get Well Talia
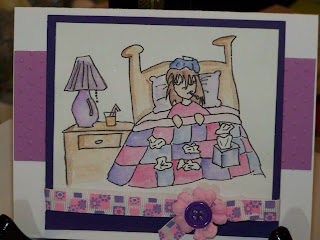
Here is a card created with original artwork (digital stamp) by my oldest daughter. I was looking online and discovered people using digital stamps and showed my daughter (who loves to draw) and she said she could come up with something for me. I make a lot of cards for a church ministry and get well cards are often needed, so out sprang "Get Well Talia". I created the card in purples, coloring the image with my favorite SU watercolor crayons, I embossed the purple strip behind the card with Swiss dots Cuttlebug embossing folder, I added the ribbon (Dots and Checks, purchased Michael's Arts and Crafts). I added a flower with button center (OTC).
My daughter created the card below with a different color scheme (using colored pencils) and cut image in oval shape and matted in light pink cardstock. She embossed the lime green strip of paper with Cuttlebug oval flower background and added a Prima Daisy Doodle (lime green) and Iced Got Flowers (pink) with a yellow brad (Spare Parts), she stamped the sentiment (Stampabilities) in basic black ink, SU; punched out with 2" scalloped circle by Fiskars, inked edges with green galore ink, SU and popped up with pop dots.
Let us know by leaving a comment (I have made it easier to do) what your first thoughts are for "Get Well Talia" and what other kinds of images she should draw using Talia. We are working on an Oliver line as well (same drawings except with a boy character). My daughter would like to create her own line of digital stamps and we are interested in knowing if anyone would like to use her work. As she creates more images we will upload samples using her original artwork. So keep coming back to see what is new.
Saturday, February 13, 2010
Valentine's Day Roses
These are beautiful surprise from my DH. He sent me roses for Valentine's Day. My son said, "I think he wants to go out with you." How cute. My husband also bought me a box of Godiva chocolate. Oh, how he knows me.
Leave me a comment as to what you received for Valentine's Day or what you plan to do for your hubby.
Teacher Valentine Chocolate
I used a recycled plastic box and decorated with pink paper that was embossed with Cuttlebug embossing folder. Inked the image with chocolate chip ink, SU, used dp from DCWV edged with Martha Stewart lace border punch on top of dark brown cardstock, The Paper Company and chocolate chip grosgrain ribbon, SU. I used Clear Dollar Stamps, Too Sweet set. Ladies these cute stamps were on clearance. My husband let me place an order for my birthday and I love them. These stamps are perfect to stamp on address labels and cover Hershey's Nuggets. The heart was from Stampabilities calendar set.
Friday, February 12, 2010
My DS Mailbox
Another Mailbox for Oldest DD
Here is another altered Target mailbox with papers chosen by oldest daughter, they are by SEI. I stamped her favorite stuffed pet Spot on the front. My daughter drew this image of Spot and her friends mom carved it out of rubber to create each girl their own stamp. We love this stamp of Spot. I tried my hand at the roses again.
The pink flower I used liquid glue instead of glue stick and it "mushed down" more. I like the chocolate brown rose better. I used the SU triple flower punch for the other flowers and used a white gel pen for insides. I stamped her mongram on the mailbox flag. She was very pleased with the outcome. Let me know what you think.
Valentine's Day Mailbox for my DD
Here is the lovely altered Target mailbox that I created for my dd. I always choose butterflies for her and I learned how to make my own roses with a 5 petal flower punch. I show a close-up above of the flowers, this was my first attempt and I just love how they turned out. This is a 1" five petal flower punch by EK Success that now has new life. I also used a Martha Stewart butterfly punch and Spellbinders butterfly die. Many flower punches by Martha Stewart and Fiskars. I also used some bling on the butterfly bodies.
The scallop circle punches are Fiskars and a Creating Keepsake monogram rub-on.
This is a tradition I started last year where I leave each of my three children some candy and a small gift each day leading up to Valentine's Day. They love coming in from school and checking their mailbox for their treat. I decorated my two girls a mailbox last year, but the school needed donations for a raffle and off they went to the raffle. So this year it was back to the "creative" drawing board. I did not decorate these specifically for Valentine's Day this year so they can be used year around. This time I decorated them based on each childs' favorite color and personalities. Please leave me a comment. I would love to hear from you about your family traditions.
Thursday, February 11, 2010
Teacher Target Mailbox
Here is my version of the Target mailbox for my son's teacher for Valentine's Day. I am going to place in some goodies like Hershey Nuggets dressed for Valentine's day with my new Clear Dollar Stamps, designed to decorate these yummy treats. I used some vintage school papers and aged the alphabet dp with Old Paper distress ink. I used one of my only teacher sentiments to adorn the front of the mailbox, stamped in white ink on black chalkboard paper (purchased from the Dollar Tree)
I used red grosgrain ribbon to adorn the edge of lid. I wanted her to think of my son when she uses this mailbox on her desk. I hope she enjoys it.
Love card
I used a card sketch for this card and was very pleased with how it turned out.
Paper: white card blank, red and white cardstock, The Paper Company; dp from Valentine cardkit purchase at JoAnn's a few years ago.
Stamp: heart tree, Hero Arts; sentiment 1John 4:19, Inkadinkado
Ink: basic black
Tools: Heart embossing folder by Cuttlebug; large circle die, Sizzix; corner rounder, EK Success
Embellishments: red grosgrain ribbon, SU, red stickles
Techniques: watercolored the hearts on tree different shades of pinks and reds and randomly covered some with stickles. I also used a stippling brush and pounced red ink on white card background.
I really like this card and think the sentiment is very appropriate. We love because He first loved us.
Enjoy and have a Blessed day.
Valentine Treats for School
Here are the Valentine Treats I made for my son and daughter's classes. For my daughter's treats I placed the scalloped circle valentine onto heart shaped fruit snacks. In my daughter's class they would prefer "healthy" snacks, so I chose to go with fruit snacks instead of candy. I hope the kids enjoy, but let's face reality, the kids do not care about the stamped image they just want the treat:)
Valentine Pops for School
Here is the class valentine from Andrew. It is a Jolly Rancher sucker with stamped Valentine images (clear stamps Animal Hearts by Inkadinkado)
I stamped them using basic black, green galore, or real red ink from Stampin' Up!
I punched out the stamped image with Fiskars scallop circle punch and cut the red scallop circle using Cricut Expression Mini Monograms cart.
I love using the autofill option and cut as many images on one sheet of paper. Works great for class projects such as these. I cut strips of paper for him to add the To and From. I think they turned out very cute. Happy Valentine's Day!
Friendship card #8
Here is another clean and simple card.
white card base
Paper: black, white and purple, The Paper Company
Stamps: Cameo ovations, Fiskars; flower clear stamps, source unknown
Ink: Lovely Lilac, SU
Tools: lace border punch, Martha Stewart; oval punch, Fiskars; flower punch, EK Success
Embellishements: purple buttons, OTC; purple floss, DMC; lavendar ribbon, Offray
Thinking of You card #7
Here is a sweet card that was made for our sweet ladies retreat. Later today I will upload a Valentine's Day card and some decorated Target $1.00 mailboxes. Please come back to see them.
cardbase was embossed with bird and flourish Cuttlebug embossing foleder
Paper: Sky blue, light blue, brown, orange and green from The Paper Company; patterned paper, not sure the source.
Stamps: sentiment, Studio G
Tools: Sizzix branch and leaves die; paisley punch (bird), Fiskars; leaf (wing), paddle punch Fiskars (anyone remember the paddle punches? They were out for a few months and then seemed to disappear.; scallop border punch, EK Success
Embellishements: black seed bead for eye
Stamped the sentiment before embossing the card background for a cleaner image.
Saturday, February 6, 2010
For My Friend card #6
This is a simple card in which I offstamped the flower under the sentiment. I stamped the flowers inside the circles to be on different sides to give more visual interest, then I inked the circle with chocolate chip ink. I colored the flowers with Gelly Roll Stardust pens.
Recipe:
Paper: dark brown, pink and cream cardstock, The Paper Company
Stamps: Fine and Dandy, Autumn Leaves;
Sentiment, Studio G
Ink: chocolate chip, SU
Tools: 2" scallop punch, Fiskars; 1 1/2" circle punch EK Success; swiss dot border embossing folder, Cuttlebug
Techniques: ink to paper, offstamping
Thursday, February 4, 2010
Hello Friend, card #5
I love, love, love this card.
Recipe:
Paper: white card base, white, black, and green cardstock, The Paper Company
Ink: Basic black, SU
Stamps: Stampendous, Sunny Flowers and Petal Plus sets
Punches: Word window, SU
Techniques: embossed edge with Swiss dot Cuttlebug border folder, and embossed two vertical lines with The Ultimate Crafter's Companion, used watercolor crayons, SU. Stamped, watercolored, and cut out two leaves and added to image with pop dots.
Embellishments: yellow rhinestones by OTC
Friends....Sweetest Gifts card #4
Shared with a Friend card #3
Recipe:
white card base
Paper: dp Chic stripes by My Minds Eye, purple and green cardstock by the Paper Company
Ink: basic black by SU
Stamps: And Everything Nice by SU
Punches: Word window by SU
Embellishments: purple brads, Spare Parts
The image is colored with watercolor crayons by SU. This sweet stamp set made a very sweet card.
Thinking of You, card #2
Recipe:
White card base
Paper: white, red, and dark brown cardstock by the Paper Company, dp by My Minds Eye
Ink: Kaleidacolor Autumn Leaves spectrum pad
Stamps: Thinking of you circle by Fiskars Wishes All Around
Punches: floral border punch by Martha Stewart, flower punch by Provocraft, 2" scallop circle by Fiskars and 1 1/2" circle punch by EK Success
Embossing folder: scallop border by Cuttlebug
Embellishments: brad from Hobby Lobby
Card Creations for Annual Women's Retreat
Over the next several days I will be adding the pictures and recipes for cards that we created for our Annual Women's Retreat. We made 22 different card versions and we gave each of the attendees a envelope box containing 4 cards and envelopes and encouraged each one to send the cards as encouragement to women who the Lord places on their hearts throughout the next several months. I also encourage anyone who is reading this blog to send a card to someone and let them know that you care, or how much they mean to you. The recipient will be truely blessed.
Butterfly friend
Recipe:
Paper: DP from Slab by Provocraft V and black and pink cardstock by the Paper Company
Ink: basic black, SU
Dies and punches: butterfly was diecut using Spellbinders butterfly and embossed, flower punch by Martha Stewart (hydrangea)
Stamps: friend from SU Noteworthy set
Embellishments: rhinestones from Oriental Trading Company
Subscribe to:
Posts (Atom)