Showing posts with label Spellbinders. Show all posts

Wednesday, December 7, 2011

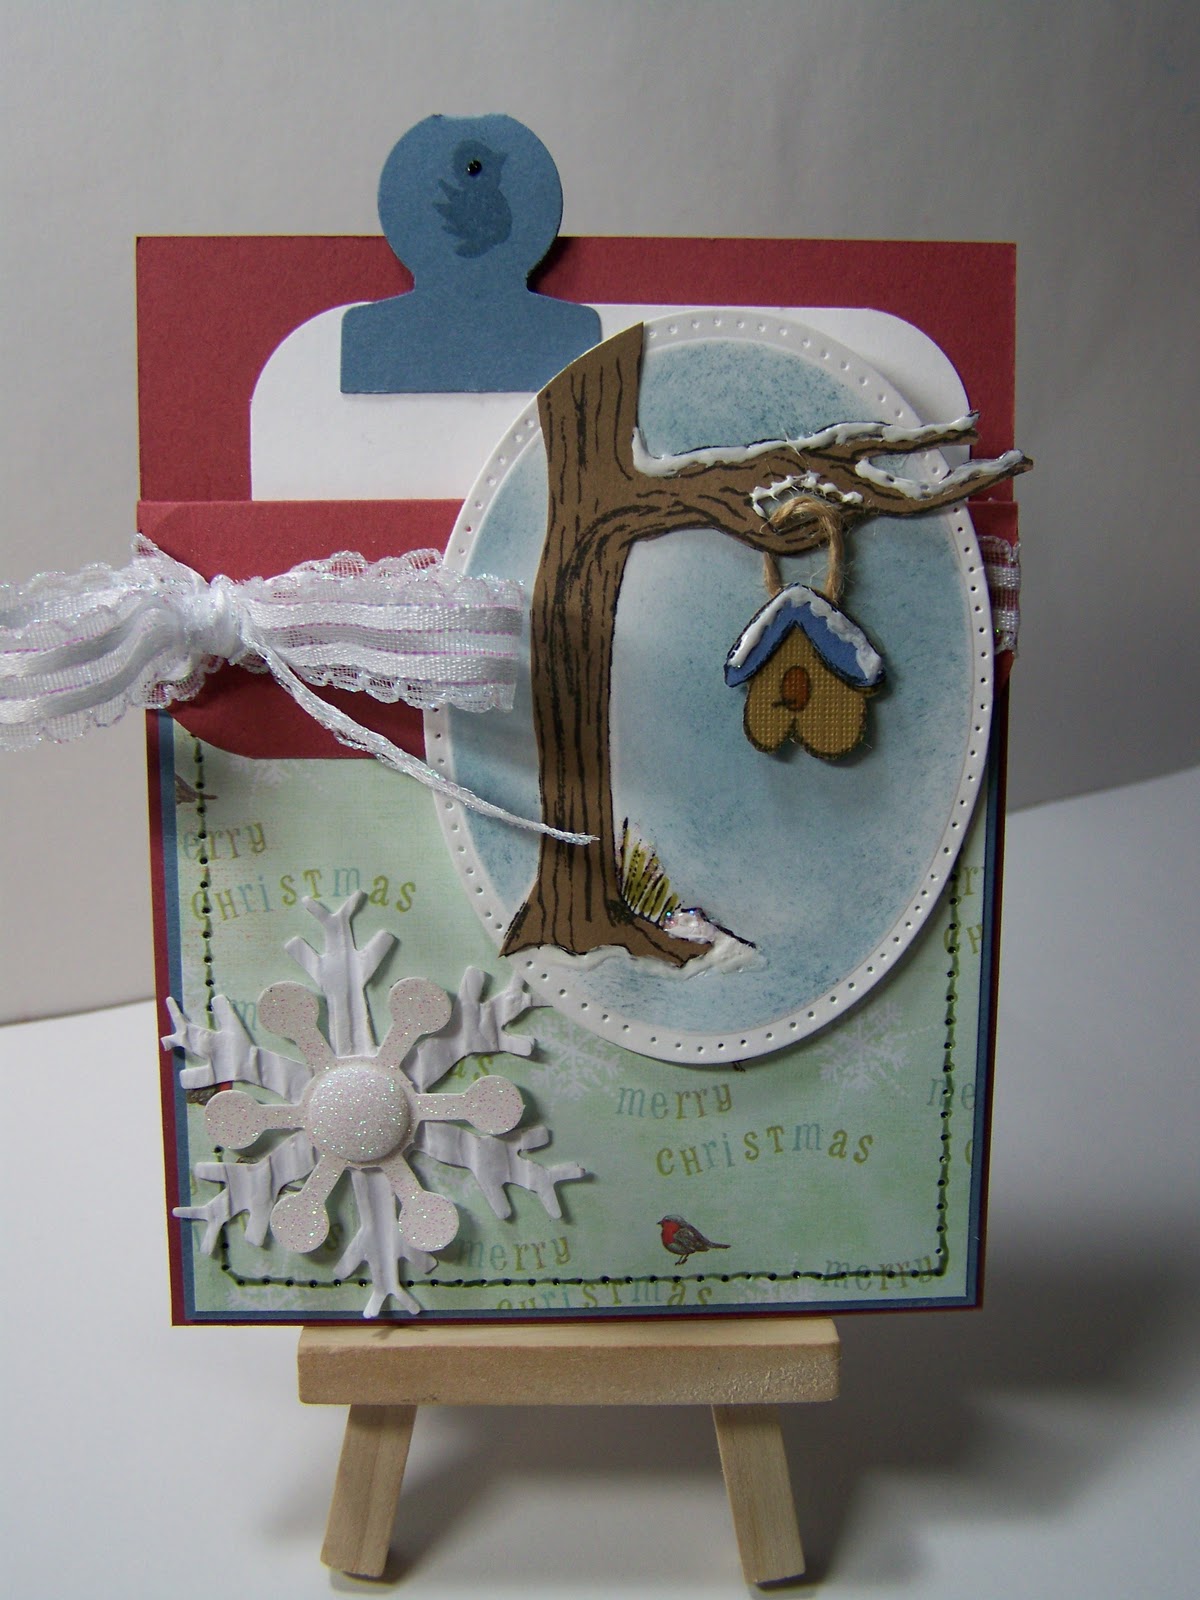
Inspired Stamps- Pocket Christmas Card

Cardstock is cranberry crisp and buckaroo blue, SU!, dp
My Mind's Eye, large snowflake Spellbinder die, small glitter
snowflake from kit, with glitter button embellie
 Hello everyone.  I hope you are all having a great week.  Today I have a pocket fold Christmas card to share with you.  I used Inspired Stamp set released last Friday called Ask, Seek, Knock and Winter Ruth set for the sentiment.  I paper pieced the tree and the bird house and I used twine to hang the bird house from the branch.  The little bird on the tag is also from this set.
 Here is the inside of the card.  I used a sentiment from Winter Ruth.  The tree and bird are from Ask, Seek, Knock set.  I added white enamel paint on trees (this one and the one on front of card) to appear like snow.


Here are both parts together.  I also faux stiched the dp to the outside and inside of the card. I enjoyed making this card.  Let me know what you think and please visit the other DT members to see their beautiful Christmas creations.  Have a great day!
Please do not forget to go to Antoinette's blog and register for the "Secret Stamp Giveaweay"

Thursday, November 3, 2011

Inspired Stamps- November Release

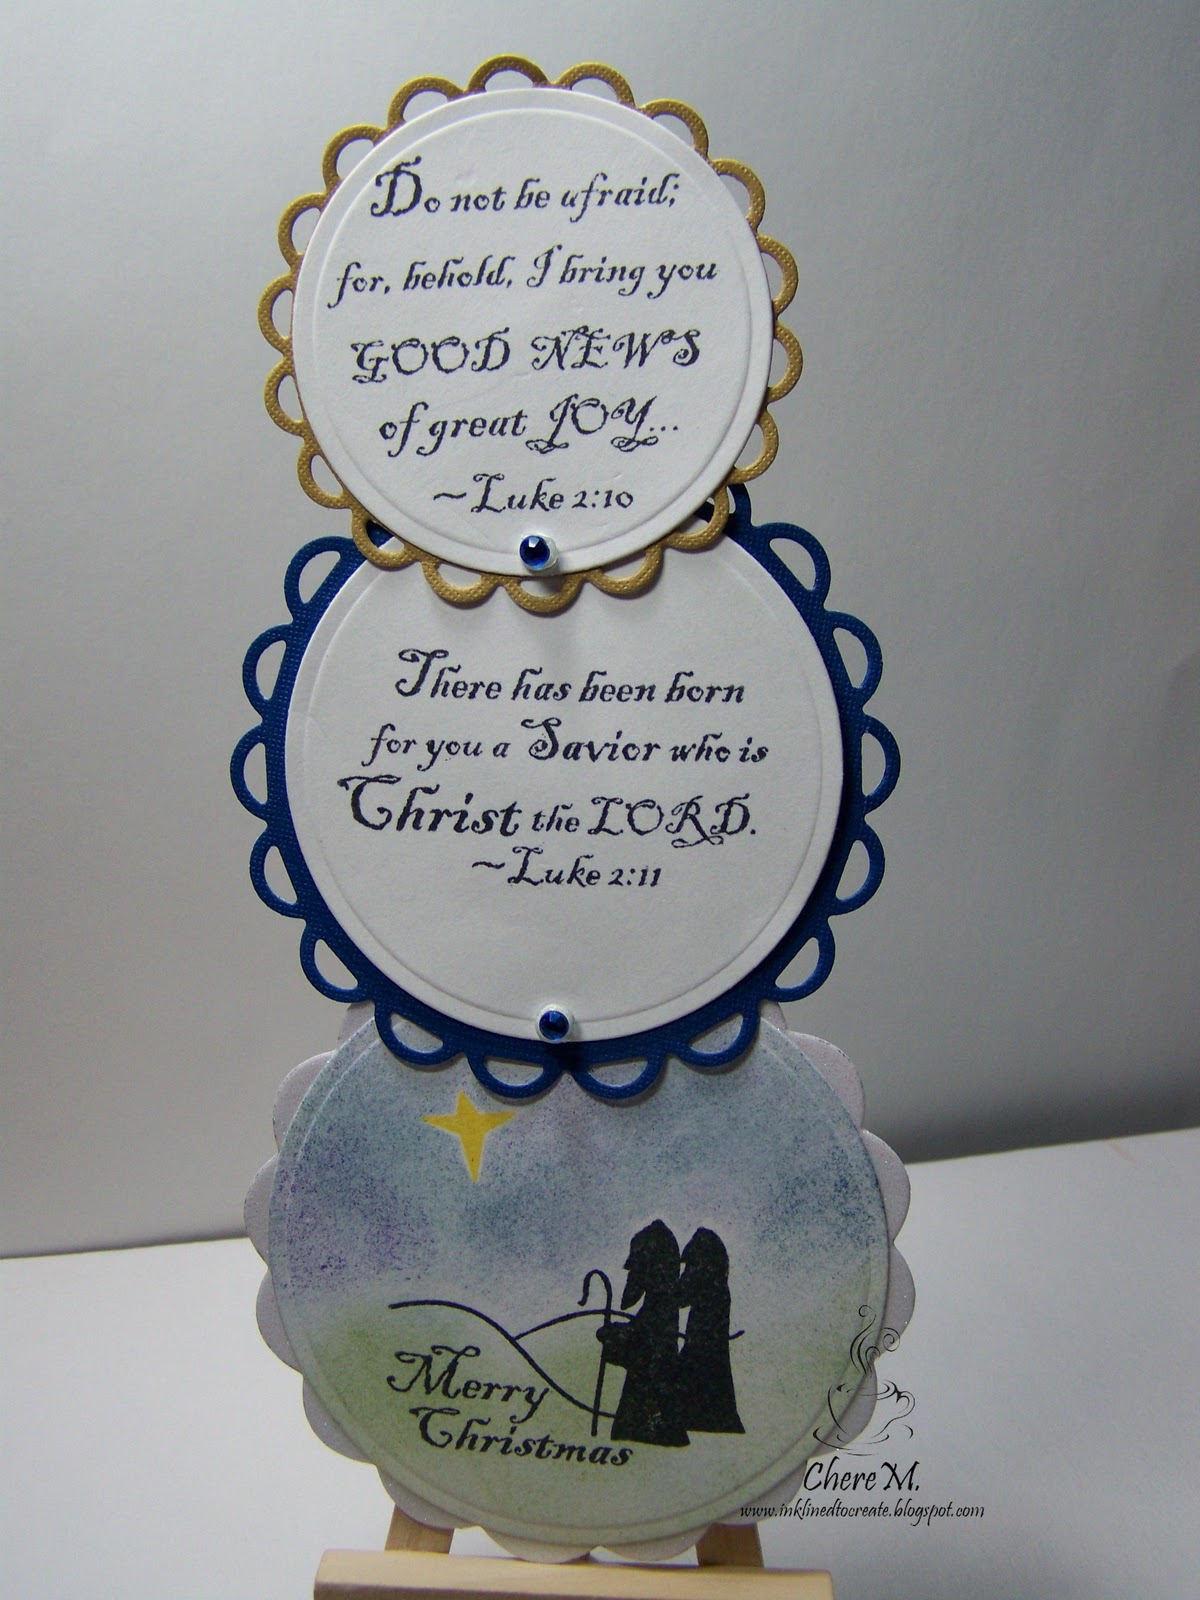
 Hello Everyone, it is Thursday and today we have some sneak peaks of Inspired Stamps November Release.  Please make sure to check out what the other Inspired Stamps DT have made with the new releases.  Check out Antoinette's blog to see who Inspired Stamps has partnered with and how you can get involved.  I have  made two cards today, I could not decide which of the sets I wanted to use, so I used both.  The first card is a telescoping card, I saw this pattern this week on Splitcoaststampers.com.  I used Vintage Christmas, Inspired Stamps with verses Luke 2:10 and 2:11 and shepherd image.  This set was perfect for this unique card.
Closed telescoping card.  I used Vintage Christmas stamp set by Inspired Stamps.
I used Spellbinder circles and eyelet circles.


I masked image to sponge background color. This is the card fully open.
This is Winter Ruth, Inspired Stamps.  The main image has her hands in her pockets,
but you can add other images, like this one of her holding a present.  I love this set and you will too.

Here she is upclose.  I colored her with Copic markers and used pop dots to raise up present.
I embossed and spritzed background with Shimmer spray.  The card base is DCWV and dp is Colorbok.
Are you ready for some great news:
;:;
Please leave me a comment and let me know what you think of these cards, these wonderful new stamps sets, which will be released at noon on Friday, November 4 at http://www.inspiredstamps.com/.

Thursday, October 27, 2011

Inspired Stamps with a Diamond Fold card


Here is the closed diamond fold card.  I used HLO choir angel and sentiment from HLO Nativity set, Inspired Stamps


Hello Everyone, it's Thursday and today we have an exciting post for you.  Each Inspired Stamps DT member has posted an uniquely folded Christmas card with instructions using Inspired Stamps images and verses.  Please be sure to stop by everyone's blog and get some inspiration for those Christmas cards. Please also check out Antoinette's October Stamping challenge on her blog for more details at www.inspiredstamps.blogspot.com.  The contest ends October 31, so head on over and enter your creations to win some great prizes
I used My Mind's Eye, Bohemia ds cardstock and Coordinations cardstock
and Spellbinders dies, snowflakes, squares and Square eyelet.
I embossed Coordination cardstock with snowflake embossing folder
and sanded to reveal core color.  I also used Martha Stewart snowflake punch.

Cut a piece of cardstock to 4" X 12" and score at 2" and 10".

Turn cardstock over and mark at 6" on both sides.

I used a ruler to fold each side down at the 6 " mark and repeat on the other side.

The cardstock  will form a point, turn around 180 degrees and fold down
each side again to form a point again.

Fold in the short sides and pinch to a point.  Repeat on opposite side.

This is what card looks like folded flat.

Here is the card open.  See the two sides we scored at 2" and 10".
Now you have a diamond in center to decorate.  This is a fun fold and as you can
see from the photos, it makes a nice display card.

Here is the same card fold with stamps from HLO Nativity set and Christmas verses, Inspired Stamps.
I used Coordination cardstock and embossed and sanded to reveal core color.

When card is open you can see Mary and Joseph.  I colored the images with Copic markers.
Please remember to check out the other unique fold Christmas cards from the other talented DT
members.  Leave a comment and let me know what you think of this unique card. 
It is easy to make and is a clever way to display your creation.

Thursday, October 20, 2011

Inspired Stamps DT Challenge plus Scripture

Scripture stamp is 1Corinthians 13:13, Inspired Stamps
Hello and thank you for visiting.  Today we were asked to design something using Inspired Stamps scripture.  I used 1Corinthians 13:13. These stamps are made in the U.S.A. and usually ship out the  day you place your order.  Please check out the other beautiful projects by our DT and check out the wide range of scripture stamps at www.inspiredstamps.com. 

I decided to make a home dec item today.  I wanted something beautiful and inspirational in my work space. I have a newly remodeled craft space and the storage items are black and white, green is my favorite color and my desk sits in front of a picture window with green, mustard and rust striped curtains, and  so that is how my color scheme was born.  I painted the frame black and crackled to reveal the white base coat.  I am not sure that my picture does it justice, but I really liked how this project turned out.

Project Details:
Stamps: 1 Corinthians 13:13, Inspired stamps;
background stamps from polka dots and paisley, SU!;
clear background stamps, Martha Stewart(used as pattern on flowers and butterflies)
Paper: white cardstock, Wausau; grungeboard, Tim Holtz
Ink: Tuxedo black, Memento; really rust, old olive, more mustard, SU!
Tools: blossom dies, Spellbinders; turning over a new leaf dies, PTI; butterfly die, Spellbinders; butterfly punch, Martha Stewart(Note:  you cannot punch through grungeboard, so I pressed down to get impression and hand cut image).
Embellishments: pearl, Recollections; mini clothespin; wooden frame; Dollar Tree

Please leave me a comment about my project.  This was a lot of fun to make and I think it could make great gifts for those you love at the holidays. It would be a great addition to any ones desk and you can find their favorite scripture verse at www.inspiredstamps.com . Please share your inspiration, what are you planning on making for holiday gifts this year.  Thank you so much for stopping by, have a great day!
Thursday, October 13, 2011

Inspired Stamps- Thankful project


Philipians 4:6-7 scripture stamp, Inspired Stamps
 Hello and happy Thursday.  I hope you all are having a great week and that you are thinking about what you are thankful for.  We were asked to make a thankful project this week.  I am thankful that God hears our prayer, but we are reminded to thank God for what He has done and what He will do before we make our requests.
  I used Fall colors (DCWV, papers) and die cut leaves (Sizzix) and added veins using my score board for added dimension.  I used Inspired Stamps Philipians 4:6-7 as my center piece.  I thought this would be a great reminder to my family to be thankful and it fits with the fall decor.
 God is good.  God is faithful.  God is merciful.  God is peace.  He is the same today and He was yesterday.  Please check out the great projects by the other Inspired Stamps DT and please check out the http://www.inspiredstamps.com/ store for the stamps used in these projects. Please leave a comment and let me know what you are most thankful for.

Wednesday, September 28, 2011

Inspired Stamps- Whimisical Tree Christmas


Hello Everyone! 
It is time for the weekly Inspired Stamps DT post.  This week we were challenged to make Christmas themed projects.  Please check out my fellow DT blogs (their links are located under the Inspired Stamps DT logo) and visit the Inspired Stamps store to see these sets and many more.  Please check out Antoinette's blog for details on the Operation Write Home (OWH) blog hop this Saturday, October 1.  This is such a neat way of sharing your "missing you" and "love you" cards with the men and women serving in our military.


Using the pine tree from Whimsical Tree set (Inspired Stamps).
I masked the center tree and stamped the trees on either side.
I colored the trees with Copic markers and used my colorless blender to create the plaid pattern.
I added red gems to tree tops.  The sentiment is from Perfect Sentiment set (Inspired Stamps)


Inside of card:  I used Isaiah 9:6 verse from the Christmas Verses set (Inspired Stamps)

Card details:
Stamps: Whimsical Trees, Perfect Sentiments, Christmas Verses, Inspired Stamps
Ink: tuxedo black and rich cocoa, Memento
Paper: Kraft card base, DCWV; white cardstock, Wausau; old olive and real red, SU!
Tools: Spellbinder dies; Cuttlebug folder
Embellishments:  red checked ribbon, recycled from Bath and Body Works gift; red gems, Michael's; red button with twine

Thank you so much for stopping by to see my post, I would love it if you would leave me a comment.  The comments really make my day.  Please stop by each of my DT member blogs and see their creations as well. Have a blessed day!

Sunday, September 18, 2011

Bowling Birthday Treat bags

 Hello Everyone, 
We had a very busy weekend.  Everyone going this way and that.  My middle daughter celebrated her birthday.  She wanted a bowling party this year.  We invited boys and girls.  I needed to make the treat bags with items appropriate for all.
I decided to use small brown paper sacks (which I purchased at Sam's Club) as the base.  I cut a scalloped circle from white cardstock and the circle from red cardstock that I embossed with Cuttlebug folder for some texture.  I wanted to simulate the wood texture of a bowling lane, but I do not own a wood grain embossing folder.  I used a sticker as a template to trace my bowling pins (I used two layers, sticking together with foam tape).  I hand drew black outline of the pin.  I used scor tape to add the red ribbon embellishment at top of pin.  The bowling ball was a 1 and one quarter inch circle (one black, one white).  I added small holes with Crop- a- dile for finger holes.  I adhered the layers with foam tape.  I coated the top of ball with Glossy accents.  I made the girl bowling balls pink and the boy bowling balls black.

I used mini composition books for the boys and cut white circle and stamped the Boy Basics: Out of this World set, PTI.  I colored the rocket and flame with Copic markers.  I used the coordinating dies to cut out the rocket, moon and star.  I used foam tape to adhere these elements.


My son made each of the boys a beadie baby.  These are his own creations, because he did not consult a pattern.  My son also made a wrist watch out of beads (not shown).
I hand sewed pencil topper for each of the girls.  These were from an AG kit.  They turned out so cute. In each goodie bag was a coordinating pencil and notebook.  For the girls I found these cute glittered spiral notebooks to which I added the foam flowers.  The kids also received a fruit roll up, pack of gum and pack of life savers at my dd request.  These were fun to put together.  Thanks for stopping by and looking.  I would love to hear from you, so please leave me a comment.

Friday, September 2, 2011

Happy Birthday- PTI Anniversary set


Hello again, here is another birthday card.  For most of these cards I tried to add something extra to the inside of the card.
Stamps: PTI anniversary set
Ink: rich cocoa, dandelion and cantaloupe, Memento; old olive, SU!
Paper: real red, SU!; harvest gold, PTI; white cardstock, Wausau
Tools: Spellbinder dies
Techniques: rock and roll, used dandelion and rolled edges in canteloupe before stamping.
Embellishments: gems colored with red Copic marker
Have a great labor day weekend.  I know my family is going to enjoy some time off.  Please let me know what you think.  I just love this set, so simple yet beautiful.

Wednesday, August 24, 2011

Mouse in Teacup-Thanks...

When I saw this Mouse in a Teacup stamp, I knew I could use it for my card ministry. Isn't he so cute?

School is back here in full swing, so we are trying to get down our schedules, so we have some bit of organization. Still working on placing everything just so in my new craft space, but the trip in July to IKEA has help quite a bit.

Card details:
Stamps: Mouse in a Teacup, Tina Wenke; sentiment, Fiskars
Paper: white cardbase, DCWV; yellow and purple cardstock, The Paper Studio; white cardstock, Wausau
Ink: Dandelion and Tuxedo black, Memento
Tools: Fancy labels, oval and scalloped oval dies, Spellbinders; flower embossing plate, Fiskars
Techniques: reversed embossed the cardbase and inked over image using inking tool to reveal flower image; colored image with Copic markers; used Sakura glaze pen to go over some of the flowers for shine and dimension
This was a fun card to make and I hope it brings a smile to the recipients' face. Let me know what you think. I love to hear from you.


Sunday, August 14, 2011

Sunflower trio


Hey everyone, school is about to start so I have been busy making sure all the kids have their "stuff" ready. I just purchased some new Spellbinders dies. So I thought I would "play" in my new crafting space (love it!), still working out some placement issues. Will move things around for a while until I get it right, but overall love it.


Stamps: Sunflower, PTI; French script background, SU!

Ink: Dandelion, Memento; old olive, SU!, close to cocoa, SU!, rich chocolate, Memento

Tools: Spellbinder Contemporary Heart Pendants; paper piercing template, SU!

Paper: harvest gold, PTI; old olive, SU!; white cardstock, Wausau paper


Please check out the paper piercing videos in the video bar below, to see more ways to use this technique to give additional dimension to your card.

Please leave me a comment and let me know what you think.