Hello Everyone. We are back with some more great projects using stamps from the January and February releases. Today I wanted to stay with the Valentine theme and use the Missing You circles set. I decided to keep card clean and simple with some creams and blacks and a pop of red for the hearts. I used a 1.5 inch circle punch and a Martha Stewart heart punch for this card. I added glossy accents to the hearts and popped them up with foam adhesive.
I hope you have a great Valentine's Day and weekend.
Check out the other DT blogs to see their creations and of course you can take a peek at all the creations at the Inspired Stamps blog and you can purchase any of these new sets at the Inspired Stamps online store.
Thanks for stopping by and have a blessed day.
Showing posts with label 1.5 inch circle punch. Show all posts
Thursday, February 13, 2014
Thursday, December 12, 2013
Inspired Stamps DT Thursday
Here is a winter card (Christmas card) that I made with two Inspired Stamps sets. 1.5 inch circle Christmas and Ask, Seek, Knock. I colored the tree from the Ask, Seek, Knock set with Copic markers and then added glittery snow medium and let dry. It gives a 3D look of snow, unfortunately the picture doesn't do it justice. We have had lots of snow here and very cold temperatures, so that was my inspiration for the card. I hope you all stay warm and have a blessed day. Please check out the other DT member creations at their blogs or at the Inspired Stamps blog.
Thursday, October 24, 2013
Inspired Stamps DT Thursday
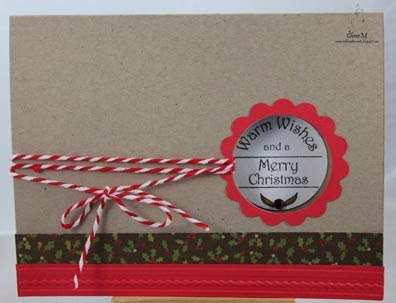
Today we are getting ready for Christmas with some more cards to the long list of those needed. I used the 1.5 inch circle Christmas stamps and punched a 1.5 inch window into the front of the card. I then punched a 1.5 inch circle on a piece of red and green cardstock and then centered my scallop circle punch over the punched circle to create the frames on each card front. I went through my stock of Christmas papers for patterns that I felt would complement each stamp and added a bit of embossing detail to the solid cardstock on the fronts. I used Christmas embossing folders, that I got at the end of last season and have not had much time to play with since. I am loving them. This stamp set comes with 6 circle stamps and my plan was to make a card with each because it was so much fun to create these, but alas life called me back to reality. There was kids to pick up, dinner to make, dishes to clean and other such obligations. Why do these necessities always come around when we are busy crafting? ha ha!
I colored small bits of the stamp with my Copic markers and added some bling. I am in love with Baker's twine so I added a bit of that as well, I need to get better at keeping it taught when I tie the bow. Uugghhh!
This above is the inside of the card 1.
Card 2: I inked the embossed cardstock with walnut stain and was a bit better in the bow tying area.
Inside of card 2: Again I added some bling and colored the star with metallic pens. I stamped tree a second time with green and cut out and adhered.
Please visit the Inspired Stamps blog for more creations and the Inspired Stamps store for these stamps and many others. Have a blessed day and thanks for visiting.
I colored small bits of the stamp with my Copic markers and added some bling. I am in love with Baker's twine so I added a bit of that as well, I need to get better at keeping it taught when I tie the bow. Uugghhh!
This above is the inside of the card 1.
Card 2: I inked the embossed cardstock with walnut stain and was a bit better in the bow tying area.
Inside of card 2: Again I added some bling and colored the star with metallic pens. I stamped tree a second time with green and cut out and adhered.
Please visit the Inspired Stamps blog for more creations and the Inspired Stamps store for these stamps and many others. Have a blessed day and thanks for visiting.
Subscribe to:
Posts (Atom)